MAILING LABELS
Available In Postcode Plus Listmaker versions only
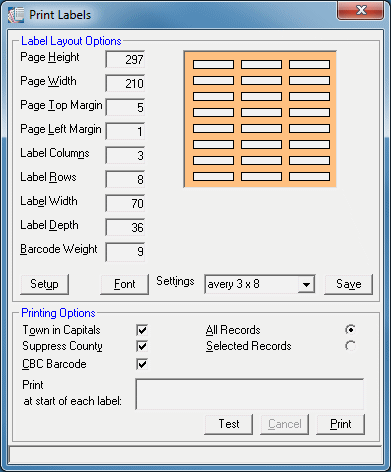
Postcode Plus can also print mailing labels or envelopes for addresses in your Results List. Choose the File menu Print option (shortcut [Ctrl]+P) to launch the Print Labels window.

This part of the window defines the physical layout of each 'page' of mailing labels. The right hand side of the window displays a visual representation of how the label sheet is made up - in terms of the number of columns and rows of labels on each page.
You should take care to ensure that you choose labels suitable for all the information to be printed on them - or data and pages may spill-over. If you intend to print Customer Barcodes, these will generally require deeper mailing labels than would otherwise be the case.
You should be aware that the final settings will be influenced by the printer's own limitations and 'built in' margins, by the actual label stock, and by the Windows Printer driver you are using.
Setting up mailing labels therefore usually involves measuring the physical sheet of labels and entering these values into Postcode Plus, then using the Test button, and making minor adjustments to the settings on a trial-and-error basis until a satisfactory result is obtained.
Page Height
The height of the page of labels - in millimeters.
Page Width
The width of the page of labels - in millimeters.
Page Top Margin
The distance between the top of the page, and the top of the first label - in millimeters.
Page Left Margin
The distance between the left hand side of the page, and the left hand side of the first label - in millimeters.
Label Columns
The number of columns of labels left-to-right across the page, Postcode Plus can print up to 4 columns of labels per page.
Label Rows
The number of rows of labels top-to-bottom down the page, Postcode Plus can print up to 12 rows of labels per page.
Label Width
The physical distance from the left hand side of one label, to the left hand side of the next one - ignoring any gap between the labels.
Label Depth
The physical distance from the top of one label, to the top of the next one - ignoring any gap between the labels.
Barcode Weight
If using Customer Barcoding, this factor, usually set between 1 - 9, allows you to adjust the thickness of the barcode stripes according to your own printer's physical printing characteristics. Typical Settings are: Dot printer 1-3, Inkjet printer 3-6, Laser Printer 8-9. Your Royal Mail Account Manager should be able to provide technical specifications of the barcode, and print samples.
Setup
This button allows you to choose the Windows printer to print your labels to.
Font
The Font button allows you to select a suitable Windows Typeface and font size for printing your labels. Remember to choose a size that will allow all of the address (and barcode if selected) to properly fit on your chosen labels.
Settings
The settings drop-down box displays a list of all the label settings you have set up. To use a different setting, simply click your chosen one. To create a new setting, simply type a new setting name in the box, then press the 'Save' button. In this way you can develop your own settings, based on an existing one.
Save
Saves the changes you have made to the current label settings.
To print a Test Page or the actual Mailing Labels, choose the label settings (see above), then use the Printing Options panel.
Town in Capitals
Royal Mail prefers the Post Town to be printed in CAPITAL LETTERS - which greatly assists mail sorting.
Suppress County
It is not necessary to print the postal county if your address contains a postcode. This option instructs Postcode Plus to omit the county from labels, whenever a postcode is present. This saves space on the labels - and is a useful way of helping prevent spill-over of text on labels, especially when Customer Barcodes are used.
CBC Barcode
This check-box allows you to optionally switch on Customer Barcode printing. Remember that you will need deeper mailing labels if you are using barcodes!
Print at start of each label
This text box allows you to enter text which should be used at the beginning of each label.
Controller'.
Print All or Selected Records
Choose whether all the records in the Results list or just the records you have manually selected from the Results List should be printed.
To select records from the Results List manually, use the [Ctrl] key plus the left mouse button to choose multiple records randomly from the list.
Cancel
The Cancel button will be enabled during label print runs. If you wish to stop the run, simply click this button. It is not available at other times.
Test
The Test button prints a single sheet of labels, using the current settings to help you ensure the settings are correct.
Print
Starts the printing of your chosen type of labels - according to the current settings.
To close the Label Printing window, click the close box on the window or press [Alt] + [F4].


