Virtual IP Address Reference
January 2015
support@pureload.com
Virtual IP Address Reference |
|
| PureLoad
5.2 January 2015 |
http://www.pureload.com support@pureload.com |
If you test a server application that makes use
of the client's IP addresses you need to configure your hosts to use
virtual IP addresses.
A virtual IP address is an
IP address that is not connected to a specific computer or network
interface card (NIC) on a computer. Data packets are sent/received
form/to the virtual IP address, but all packets travel through real
network interfaces.
To be able to use virtual IP addresses mosts network tasks
(including the HTTP tasks) allows setting the local IP address. There
is also a set of tasks, the IP Pool tasks, to manage a pool of
IP-addresses per PureLoad worker to make sure that parallels threads
doesn't use the same IP address at the same time.
This document gives an introduction on how to set up virtual IP
addresses and describes the IP Pool tasks.
How to configure virtual addresses is platform dependent and
requires general knowledge on how your network is configured. If you
want to create many virtual addresses in bulk and to keep the addresses
permanently, you need to consult your OS documentation.
Still, this section gives you an overview on how this is done for a
few different Operation Systems.
The procedure to configure virtual IP addresses under Windows
XP/2000is as follows. This can be performed only by an user with admin
privilege.
You will have to re-start the system for the changes to take effect.
To configure virtual IP addresses in Linux, you use the configured
command with super user privilege.
For example if you network interface is eth0 and the primary IP
address is 192.168.2.1 you use ifconfig as follows:
| ifconfig eth0:1 192.168.2.2 netmask 255.255.255.0 up ifconfig eth0:2 192.168.2.3 netmask 255.255.255.0 up |
This adds two virtual interfaces with IP address 192.168.2.2 and
192.168.2.3. The interface number must be unique for each
interface (for example eth0:1, eth0:2 etc).
For example if you network interface is hme0 and the primary IP address is 192.168.2.1 you use ifconfig as follows:
| ifconfig hme0:1 192.168.2.2 up ifconfig eth0:2 192.168.2.2 up |
This adds two virtual interfaces with IP address 192.168.2.2 and 192.168.2.3. The interface number must be unique for each interface (for example hme:1, hme:2 etc).
The IPPoolInitTask is only executed once per load test session and creates the pool with addresses.
The pool can be initialized in two ways:
An example where the pool is initiated from a range:
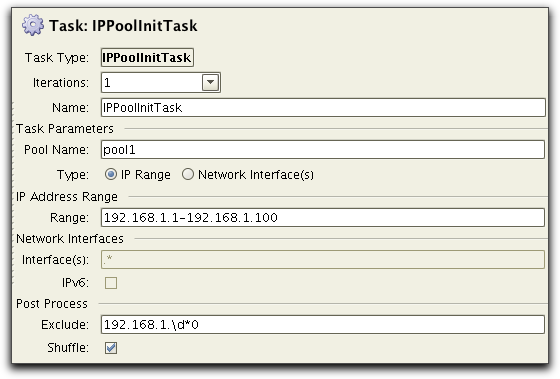
The range creates IP addresses 192.68.2.1 to 192.68.2.100, excluding
all addresses ending with 0. The "Shuffle" option is used to ensure
that the generated numbers are not stored in the pool ordered.
The range can be specified in several ways:
| 192.168.184.12,192.168.182.10-192.168.182.18 (combines
specific address and a range) 2001:db8::1-2001:db8::3 (IPv6 range) 192.168.55.0/24 (IPv4 CIDR, yields: 192.168.55.1 - 192.168.55.254) 2001:db8::/120 (IPv6 CIDR, yields: 2001:db8::0 - 2001:db8::ff) 2001:1b70:5000::8a2e:0370:7334/40 64 (CIDR IPv6 with variable range) Useful with prefix ID and fixed device ID. Above example yields: 2001:1b70:5000:0000::8a2e:0370:7334 2001:1b70:5000:0001::8a2e:0370:7334 ... 2001:1b70:50ff:ffff::8a2e:0370:7334 |
Another example, where the pool is generated by probing the
interface (in this case the physical interfaces e100g0, e100g1
and e100g3):
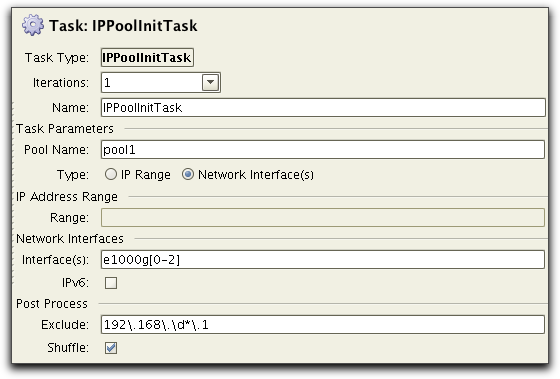
Here we exclude all addresses ending with ".1".
To get next available task from the IP pool, the PoolGetTask is used:
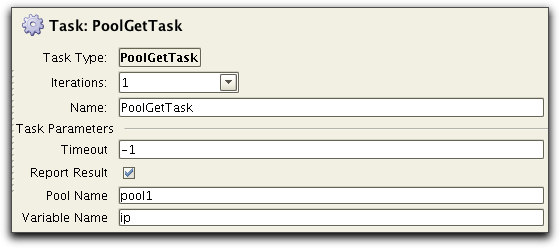
As Pool Name we specify the name of the IP pool created by
IPPoolInitTask. We assign the retrieved IP address to the variable
"ip". This variable can then be used in other task where we need to
specify the local IP Address.
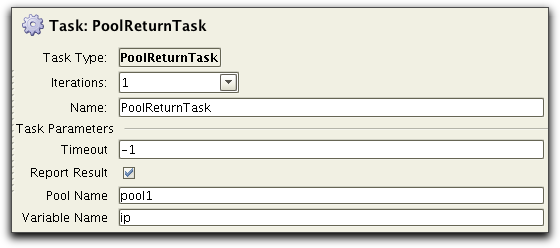
When we do not need the IP Address retrieved by PoolGetTask, we must
return it to the pool using PoolReturnTask: