Testing Web Applications
January 2015
support@pureload.com
Testing Web Applications |
|
| PureTest
5.2 January 2015 |
http://www.pureload.com support@pureload.com |
Web application today are (ofcause) accessed using desktop web
browsers, but also more and more mobile devices. This document
will describe the tools avaliable to create scenarios for web
applications, but also more detailed information how the HTTP
tasks might be used, how to simulate different browsers and/or
mobile devices etc.
As when testing any server applications, using PureLoad or
PureTest, the steps are:
When testing a Web application, you have two tools to assist you
for the first step:
To modify the requests sent during a test, verify and extract data from responses etc. a number of HTTP Tasks exists.
The HTTP Recorder is a proxy server which works like an ordinary
HTTP proxy server, but also analyzes the requests sent by the
browser and creates sequences of tasks organized into scenarios.
The recorded scenarios can then be copied into PureLoad or
PureTest.
The recorder is started from the PureLoad or PureTest Console, using the menu item Tools->HTTP Recorder.
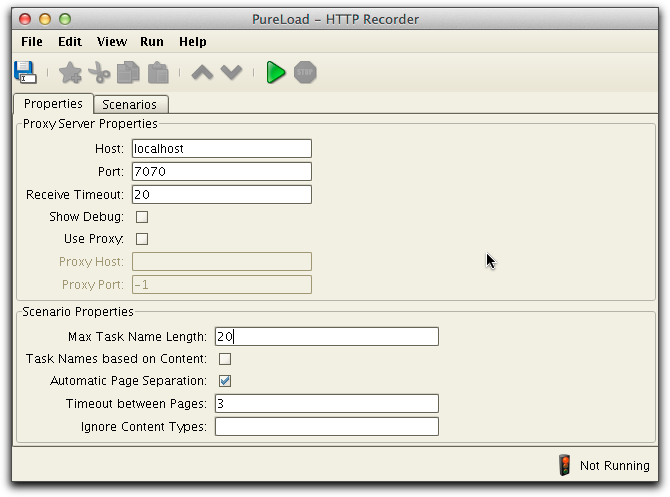
The first tabbed pane is used to set up the recorder/proxy
properties and the other tabbed pane is used to view recorded
scenarios.
You need the recorder to capture the traffic between a web browser and the web server. This is accomplished by defining the HTTP Recorder as a proxy in the web browser. The recorder is configured using the Properties tabbed pane.
The Host and Port parameters specify the host name (or IP address) and port number of the machine that the HTTP Recorder will run on. The host name field determines which network address the recorder will use (leave this field blank to use all addresses, including localhost).
The Receive Timeout parameter specifies the time in seconds before the recorder will time-out a request and continue with other requests. The Show Debug parameter can be used to show all the HTTP requests and responses that the recorder is handling. Normally you should leave this off. If access to the web server goes through a proxy, you must select the Use Proxy check box and provide the host (or IP address) and port of that proxy in the Proxy Host and Proxy Port fields.
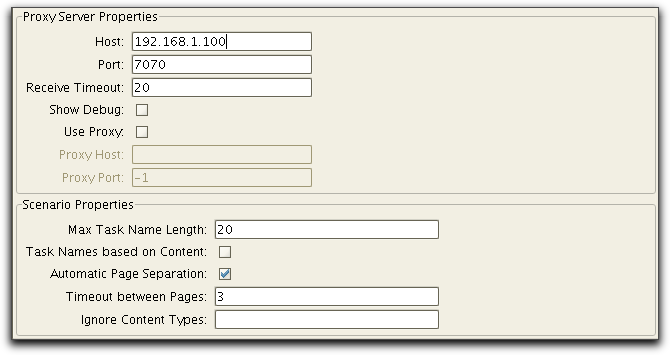
Scenario Properties controls how scenarios are generated during recording:
The recorder will generate task names based on the actual URL of
the request. The Max Task Name
Length parameter specifies the maximum length of the
task names. If a name is longer than the specified maximum then
the leading part of the name is truncated.
If the check box Automatic Page
Separation is checked, then the recorder tries to
determine when a new web page is accessed. Each page is stored as
a task sequence of HTTP tasks. A new page is assumed to have
started when the time between requests is more than what is
specified in the field Timeout
between Pages.
Ignore Content Types is
used to specify resources that should be ignored by the recorder.
Examples of content types are image, application, text/css.
Resources that begin with any of the specified types are simply
ignored. Use a comma "," to separate the listed types.
You can record HTTP and HTTPS requests from any web browser or
device, provided that the it supports setting of the HTTP and
HTTPS proxies. You have to change the proxy settings to match to
the host and port of the recorder.
The step by step instruction below covers how to define the proxy
settings for desktop browsers and one smartphone. Others are
usually configured in a similar way.
Google Chrome uses the same connection and proxy settings as Internet Explorer. Changing these settings affects Google Chrome as well as Internet Explorer and other Windows programs.
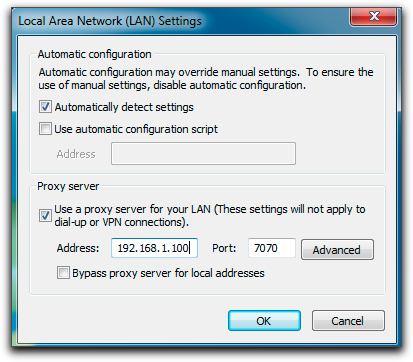
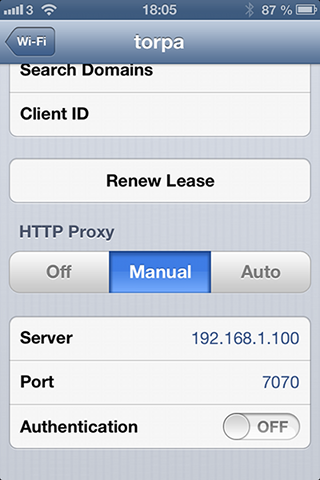
Using WiFi you can configure your iPhone to use the HTTP
recorder. Use the Settings-> Wi-Fi and select your network.
Scroll down and edit HHTTP Proxy settings as follows:
To verify the proxy settings of your browser or device follow
these steps:
If you see a PureLoad page for each of the URL's then the configuration is working properly.
Since the recorder acts as a regular HTTP proxy, it will pass on
the requests made by the client browser. One important aspect to
consider is how the browser handles cookies and cached content.
Content stored in the browser cache will not be requested from the
server and will therefore not be recorded.
If you wish to simulate client browsing the site for the first
time, you should make sure that all cookies are removed and that
the cache is cleared before starting the recording session.
 button in
the tool bar. Once the recorder proxy has been started and the
browser has been configured to use the recorder proxy, you can start
using the browser. From now on, all requests will be recorded by the
HTTP Recorder and converted into tasks and show up in the Scenarios
tab while recording.
button in
the tool bar. Once the recorder proxy has been started and the
browser has been configured to use the recorder proxy, you can start
using the browser. From now on, all requests will be recorded by the
HTTP Recorder and converted into tasks and show up in the Scenarios
tab while recording.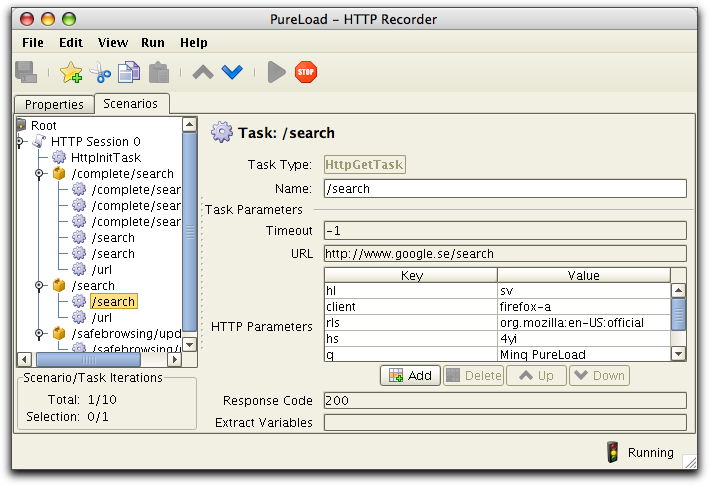
To stop recording use Run->Stop
Proxy menu choice or the  button in
the tool bar.
button in
the tool bar.
You can also save the recorded scenario(s) to file, using File->Save As... and
load the file into PureLoad or PureTest.
The Web Crawler is intended to help creation of scenarios that can put load on many different static resources on a Web server. It also offers additional functionality to list the tree of resources, present statistics, show errors, etc.
The crawler can be started from the PureLoad Console or PureTest,
using the menu item Tools->Web
Crawler.
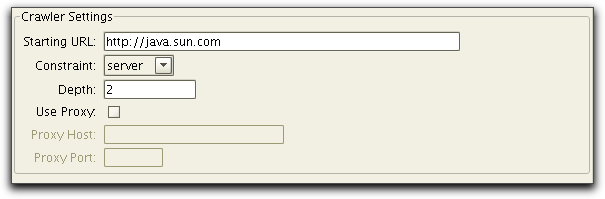
The Crawler is configured using the Settings tab:
You start crawling by selecting the Run->Start Crawler menu choice or the button in the tool bar. The status
bar will shift into running state and show some execution
information:

Queue shows how many
resources that are currently waiting to be processed and the
number currently in progress. Resources
shows the number of resources that have been processed. (Resources
in this context means web resources such as HTML files and
images.)
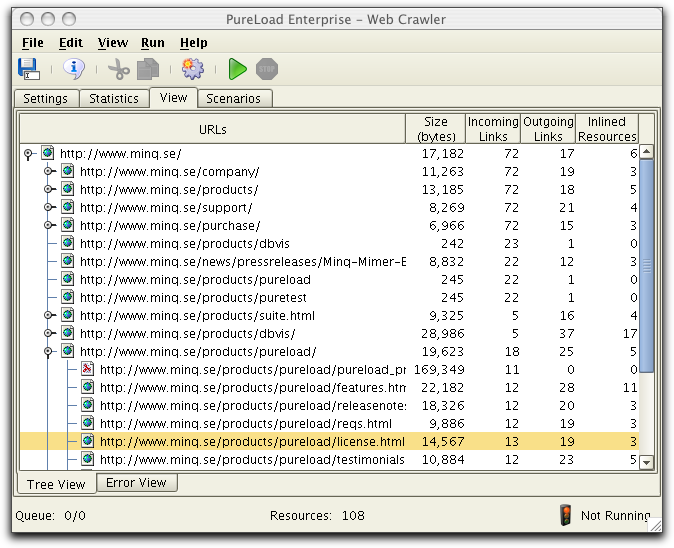
The View tab contain two sub tabs at the bottom, Tree View and Error View. Tree View shows
all resources that are found during execution of the Web Crawler.
Error View lists all resources that were invalid during retrieval
from the web server. The most common problem here is that a
resource was not found (aka "broken link"). Since the structure of
a web site is actually a graph, not all references will be visible
in the tree:
The web crawler process a web by starting at the HTML page
identified by the specified Starting URL. The crawler parses the
HTML page for all outgoing references. If an outgoing reference is
of an appropriate type then the resource itself is fetched and all
its outgoing references are parsed. The web crawler continues this
process until no more resources are available. The web crawler
perform the parsing in parallel and the order of the resources in
the tree might change from one execution to another.
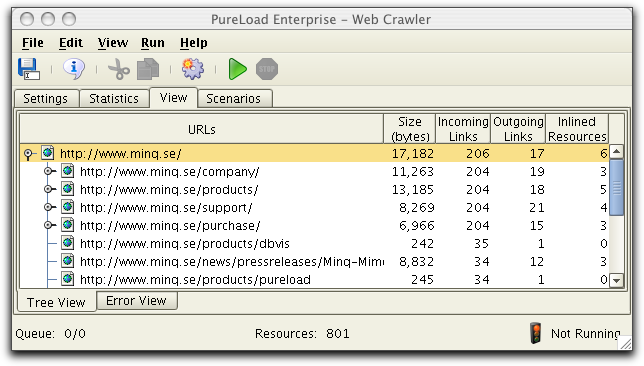
The Bytes column shows
the number of bytes of each resource as reported by the web server
(some web servers do not report bytes correctly). Incoming Links lists the
number of resources that references the listed resource while Outgoing Links lists the
number of resources the resource itself refers to. Inlined
Resources are the number of references that typically targets
image files (inlined Resources can be viewed in the Resource
Information dialog).
The Error View is useful since it only lists resources that was found to have errors during the crawler execution:
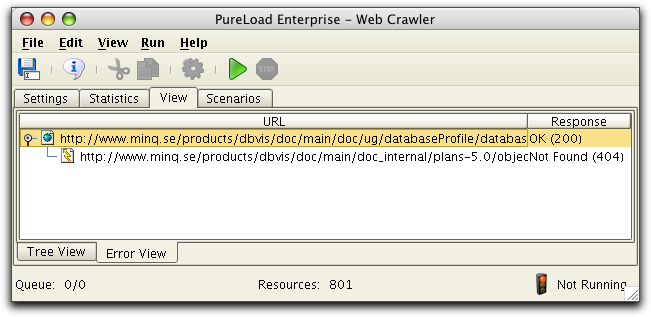
Note that the pages causing the errors are shown as root nodes in
the tree with children being the actual references that failed.
It is possible to view detailed information for a resource in any
of the Tree or Error views. Select a resource and press the
Information button  in the tool bar and the
following dialog is displayed:
in the tool bar and the
following dialog is displayed:
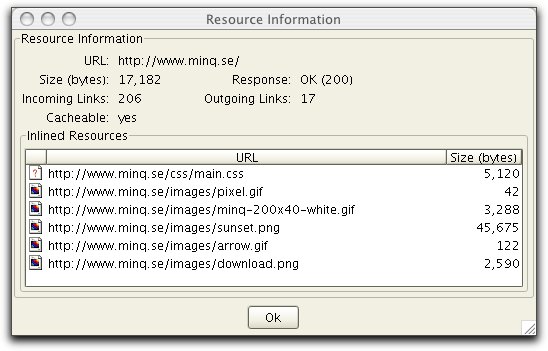
The Incoming Links
number specifies from how many sources that the URL is referred
while Outgoing Links
specifies how many resources the URL refer to.
The Statistics main tab lists statistics summary for the web that
has been crawled. The information is updated every 10:th second
during crawler execution.
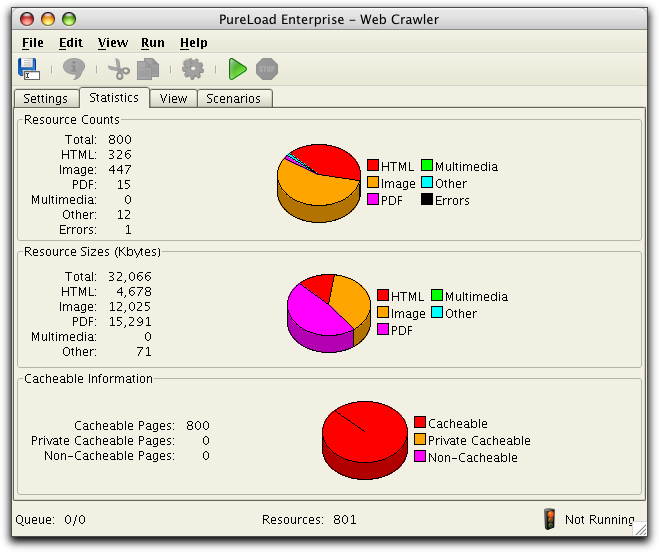
Most of the statistics information are self explanatory.
Once a web has been crawled, you can generate scenarios. The
crawler generates scenarios based on the selected resources. A web
(HTML) page will be created as a Task Sequence in the generated
scenario while other resources will be Tasks. The crawler can only
handle static resources. This means that session management, HTTP
post forms, etc. are not supported.
The following example shows the Tree View and the selection that
the scenarios will be created for.
The File->Generate Scenario
menu choice or the  button in the tool
bar will display the following dialog:
button in the tool
bar will display the following dialog:
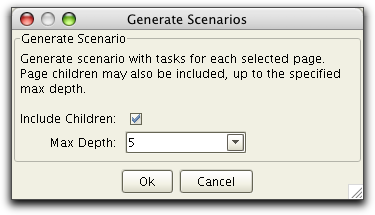
The Include Children
check box is used to specify if the generated scenario shall
include all child resource in the tree for the selected resource.
Max Depth specifies the
number of child levels to include.
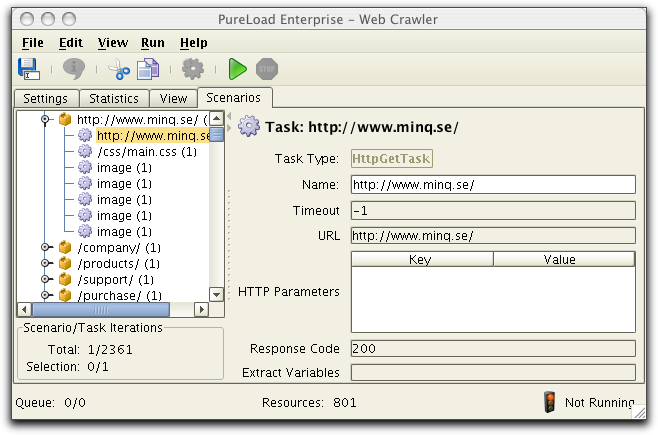
The following figure shows the Scenario tab with the newly created
scenarios:
The scenario information can be saved to a PLC (PureLoad
Configuration File) and later be opened in PureLoad or PureTest.
It is also possible to use the regular copy and paste
functionality in order to copy the scenario from the Web Crawler
into the Scenario Editor.
For information about the provided HTTP tasks, see the Task Reference document.
Since the HTTP protocol is stateless, most modern server side technologies keeps the state information on the server and passes only an identifier between the browser and the server. This is called session tracking. All request from a browser that contains the same identifier (session id) belongs to the same session and the server keeps track of all information associated with the session.
A session id can be sent between the server and the browser in one of three ways:
If cookies are used to handle session id's, nothing has to be configured in the HTTP Tasks to handle this. The other two ways are variants of URL rewriting and handled in the HTTP tasks using the URL rewriting support.
To use URL rewriting, the HttpInitTask must be used first in the scenario for the sequence of tasks that will use this. The following picture shows the relevant part of the HttpInitTask:

HTTP Tasks that follow the HttpInitTask will use this information
to determine if URL rewriting should be used and parses returned
pages to retrieve the current session id.
The Session Id String
field must include the string that identifies the session id in
the URL. The following list illustrates identifiers for a few
common kind of systems, example of an URL and matching Session ID
String.
Please consult the documentation for your specific system to find the correct identifier for your system.
When a sequence of HTTP requests are recorded in the recorder,
URL rewriting is ignored. I.e. you do not have to care if URL
rewriting is used or not during the recording phase. After the
recording phase is over, save the scenario, or copy into the
Scenario Editor.
Then open the scenario in PureLoad or PureTest and adjust the Use
URL rewriting and Session Id String parameters of the
HttpInitTask, as described above.
In some web applications sessions are not used, or only used for
some part of the application. Instead other mechanisms to handle
state information are used. I.e. web-pages are dynamically
generated and one HTTP request is based on information generated
in previous HTML pages. For example this can be HTML references
with generated parameters or a HTML form with hidden input fields,
used to generate HTTP POST parameters.
In cases like this the dynamically generated HTTP code must be
parsed to find parameter values to be used for following requests.
This kind of parsing is supported, using the Extract Variables parameter in
most HTTP tasks.
Specified variables are extracted by searching and parsing
returned HTML content. Only valid HTML is searched looking for:
There are cases where non-standard HTML are used to pass state
information. This could for example be JavaScript or other
scripting languages. In cases like this you have to manually
extract information using HttpExtractTask.
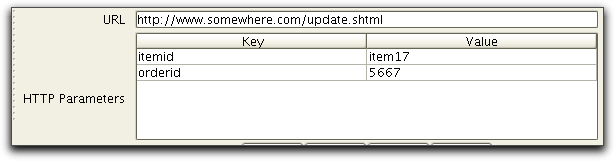
Let's say that we have recorded two tasks using the HTTP recorder. The first task is a HttpGetTask that displays a dynamically generated Web-page that includes a form to be posted, similar to:
<form method="post" action="update.shtml">

        <input type="hidden" name="itemid" value="item17">

        <input type="hidden" name="orderid" value="5667">

        ...

        <input type="submit" value="Place Order">

      </form>
The next task in the sequence is a HttpPostTask, with parameters defined by the form in the previous HttpGetTask described above. During recording the following parameters are recorded:
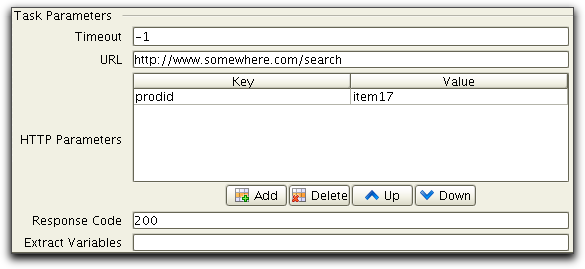
To make sure that the parameters are based on actual values from the form we can use Extract Variables in the previous HttpGetTask task as follows:

In other words: a comma separated list of parameters to be
extracted and replaced in next task.
Now when the first task is executed, the generated HTML will be
parsed and the hidden fields: itemid
and orderid will be found
and the actual values saved. The next task will use these values
as values for the parameters.
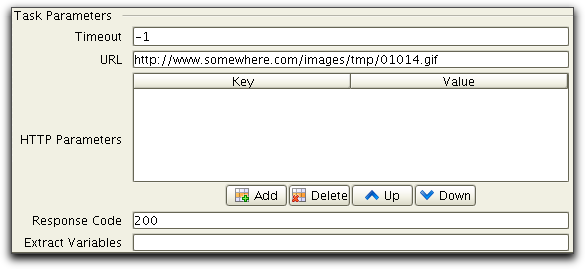
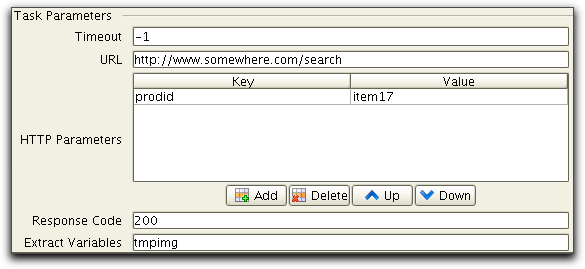
In this example we have recorded a dynamic web application that generates an URL to an image, as result from a previous request. The first recorded task is a HttpPostTask:
this request will return a page with a reference to a dynamically
generated image:
<IMG NAME="tmpimg" src="/images/tmp/01014.gif">The next recorded task is a HttpGetTask that access the
generated image:
When testing this we do not
want to use this static URL. Instead we want to use the actual URL
that are dynamically generated by previous task. To do this we
must parse the IMG tag from the first task and use the dynamically
generated URL in the second task.
This is done by using Extract Variables in the first HTTP task as
follows:
In the second task the static URL is modified from /images/tmp/01014.gif to using the variable tmpimg as follows:
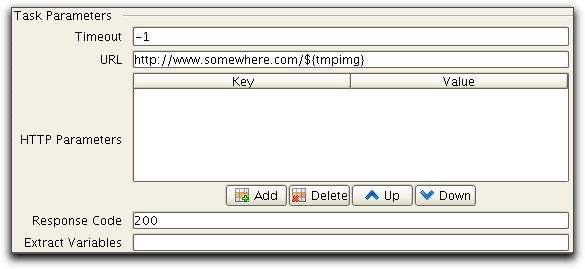
When executed tmpimg will be extracted from the result of the
first task and used by the second task to create an URL to the
generated image.
The described method to extract variables in HTML content only
works if variables are stored in standard HTML (such as hidden
fields in forms). But it is quite common that variable values are
handled by JavaScript (or other scripting language embedded in
HTML comments). To handle this the HttpExtractTask must be used.
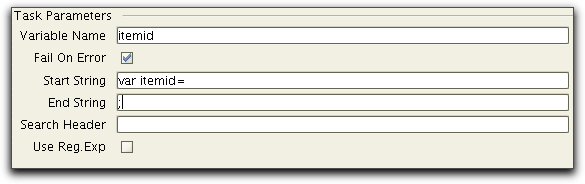
For example if the example presented in previous example did not
use a simple form with hidden fields to pass the variables, but
instead used JavaScript and variables where passed as:
<SCRIPT LANGUAGE="Javascript">

          ...

          var itemid=6677;

          var ordernr=78788;

          ....
In this case we insert two HttpExttractTasks after the first HTTP
request and extract the variables as follows:
Variables extracted from parsing are stored per Scenario. This
means that there might be name clashes. I.e. the same parameter is
used in several pages per scenario. To overcome this a special
syntax can be used to parse a variable and name it something else.
To do this use the syntax when extracting variables:
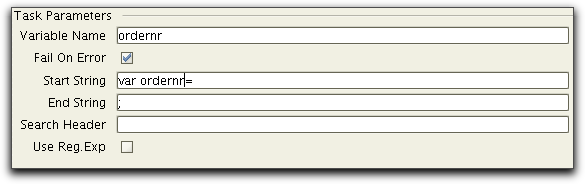
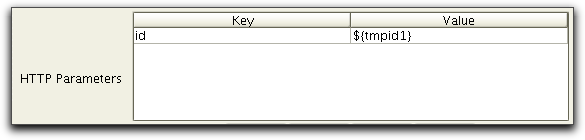
${<variable-name>}=<variable-to-parse>For example let say that you need to parse the value id from the result of one task and store it as tmpId1. In this case you use Extract Variables as follows:

The variable can then be used as a HTTP parameter as follows:
The HttpVerifyResponseTask and HttpExtractTask supports PERL style regular expressions. This documentation does not include any detailed description on regular expressions but an excellent tutorial and overview of regular expressions is Mastering Regular Expressions, Jeffrey E. F. Friedl, O'Reilly and Associates, 2006. If you have a specific problem, that you suspect could be solved using regular expressions, please contact support@pureload.com for help solving your problem.
A simple example how to use regular expressions is if you have a HTTP request that returns a HTML page with some pattern that indicates an error on failure. Let us say that this page includes the string 'Error', followed by some text and again a string 'failed'. In this case we want to use HttpVerifyResponseTask as follows:

Where .* matches any character. But note that by default this
does not includes any line terminators. So if 'Error' and 'failed'
are separated by several lines, we have to use an embedded flag
expression (?s) as follows:

This example shows how to use a regular expression to obtain an
id parameter form a returned HTML table. The example represent a
message board application with the messages and links for deleting
the messages. Imagine that the application returns the following
HTML.
    <TR><TD>New radio
        broadcasting!</TD>


                 <TD><A
        HREF=delete.shtml?Id=810>Delete</A></TD>

            </TR>

            <TR><TD>Weather: Storm
        ahead</TD>

                 <TD><A
        HREF=delete.shtml?Id=811>Delete</A></TD>

             </TR>
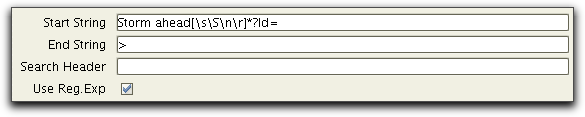
Say that we would like to extract the id of the item with the
message "Weather: Storm ahead". In the example this would be
'811'. The parameters of the
HttpExtractTask could then be defined as:
The variable messageId could after the HttpExtractTask be used to
call the delete link as a HTTP Task using the URL:
The HTTP tasks supports HTTPS using Java Secure Socket Extension
(JSSE). JSSE supports SSL v3, TSL 1.0, strong encryption etc. For
details on supported cryptographic suites see Sun's JSSE page at java.sun.com/products/jsse.
To use HTTPS with the HTTP Tasks you simply specify an URL, using HTTPS as protocol. I.e. use an URL such as https://www.thawte.com.
More and more users use mobile devices when accessing Web
Applications and access from mobile devices are becoming
increasingly critical to the business. The difference in behavior
is largely due to smaller screen size and different logging
behavior of mobile devices. Also there are bandwidth limitations
set by the mobile network. To support realistic performance tests,
simulating mobile devices the following features are provided:
Simulating bandwidth limitation can be done by using the Bandiwdth Limit parameter of HttpInitTask:
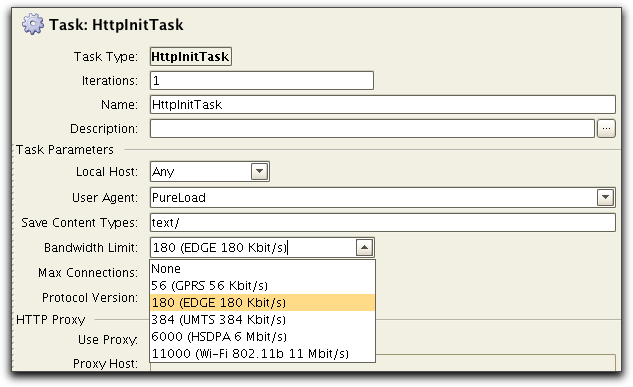
All HTTP tasks following this will use the specified limit.
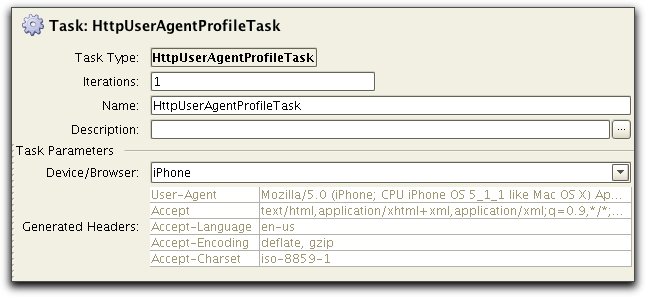
Simulation a specific device or browser can be done by specifying
User Agent in HttpInitTask and adding device specific headers
using HttpHeaderTask. A more convinient way is to used
HttpUserAgentProfileTask, typically after HttpInitTask has been
used: