Task Programmer's Guide
January 2015
support@pureload.com
Task Programmer's Guide |
|
| PureTest
5.2 January 2015 |
http://www.pureload.com support@pureload.com |
Tasks are implemented in Java. An overall knowledge of Java and
the environment used to develop Java classes is needed. Developed
Tasks can also have various dependencies to external APIs,
products, etc. It is important to have a basic understanding of
these external dependencies and how they are used technically to
be able to implement optimal tasks.
The following requirements should be fulfilled before starting to
develop custom tasks:
A Task is a Java class which follows certain rules and patterns.
It normally implements a user operation (or part of) using an
existing Java API, that can be an API developed for a specific
application or any of the standard APIs included with the Java
platform.
One or several tasks are then assembled in a scenario before
execution in any of the runtime environments that are part of the
Pure Performance suite.
There are a range of features available to make tasks dynamic with
concepts such as task parameters, attribute contexts, parameter
generators and scenario variables.
The life cycle of a task can be mapped into the following stages:
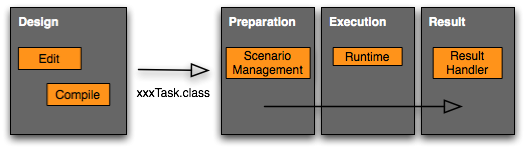
The design phase is performed using a Java development
environment of choice. The task is implemented according to the Task API.
The preparation work is managed in the Scenario Editor tool (i.e.
PureLoad Console or PureTest applications). The scenario editor is
used to model the content of a scenario in terms of tasks. The
tasks are also parameterized, either manually or by using task
parameter generators for automatic values. One important feature
in the scenario editor which is targeted for task designers is the
Task Types functionality. Use this feature to manage your custom
tasks.
The execution stage is as it sounds, the phase when scenarios of
task are executed. This is performed by the runtime environment.
The following describes the runtime environments for the
applications in the Pure Performance suite.
The result stage is used to collect various execution results and
present them in the current application. PureLoad shows real-time
results while a load test is running and it is also possible to
generate reports.
This section describes the basic steps to implement a task. As an
example, a simple task will be implemented that logs some
messages. The source code for this example is provided with the
application in the <install-home>/examples
directory,
where <install-home>
is
where you have installed PureLoad or PureTest.
This section only covers the basics of task implementation.
Details are described later in the document.
In this section we start by implementing our example task class,
EchoParmTask.
All tasks must implement the com.pureload.task.api.Task
interface:
| import com.pureload.task.api.*; /** Simple task to echo messages to stdout */ public class EchoParmTask implements Task { public void execute(TaskRuntime rt, TaskResultHandler trh) throws TaskExecuteException { System.out.println("Hello Mom!"); } } |
The Task interface requires one method to be implemented:
execute(). It is usually a good idea to split up a complex
operation into smaller parts where each part is in the form of a
task. This makes the task a better candidate for re-use in other
scenarios. Look at the supplied tasks and their design to find out
more of how to organize tasks.
Compiling of tasks is done using your favorite development
environment. Make sure to include <install-home>/lib/task-1.1.jar and all other
dependencies the task may have in the development environment
CLASSPATH.
The following shows an example using javac:
| % javac -d <install-home>/extensions/classes -<install-home>/lib/task-1.1.jar EchoParmTask. |
Custom tasks are installed by copying all task class files to the
<install-home>/extensions/classes
directory.
The task classes can also be packaged in a JAR file which can be
placed in the <install-home>/extensions
directory.
Additional third party JAR files must also be placed in the <install-home>/extensions
directory.
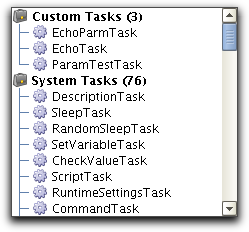
All tasks represented with the  icon indicates
that they are successfully loaded. An
icon indicates
that they are successfully loaded. An  indicates that there were
problems loading the task. In this case select the task and check
the error message in the right area of the display.
indicates that there were
problems loading the task. In this case select the task and check
the error message in the right area of the display.
If a task class or its accompanying bean info file is re-compiled
while the application is running then one can force a reload of
the custom task classes. Do this from within the Task Types sub
tab in the scenario editor by selecting the Task->Reload
Current Custom Tasks menu option. This will only reload the
currently loaded tasks. Any errors that are found during load is
indicated in the tree.
Select the custom task to delete in the tree and choose
Edit->Delete or the  button in the tool
bar. If the removed task is part of a scenario then a dialog will
be displayed in which the deletion of the task must be confirmed.
button in the tool
bar. If the removed task is part of a scenario then a dialog will
be displayed in which the deletion of the task must be confirmed.
Note: It is not possible to
delete system tasks or to modify the ordering of system tasks in
the task types tree.
The Scenario Editor Debugger is used to execute one or several
tasks defined in a scenario. Go to the Scenario Editor sub tab,
select the root node and create a scenario node using the
Edit->Create Scenario menu choice or the  button in the tool bar. Now you can add task types to the
scenario. Make sure the newly created scenario node is selected
while you choose the Edit->Create menu choice (or the button). The list of available task
types is now displayed from which task types are selected for
inclusion in the scenario. Do this by double clicking on a task or
by using the Add button. The scenario now looks like the following
button in the tool bar. Now you can add task types to the
scenario. Make sure the newly created scenario node is selected
while you choose the Edit->Create menu choice (or the button). The list of available task
types is now displayed from which task types are selected for
inclusion in the scenario. Do this by double clicking on a task or
by using the Add button. The scenario now looks like the following
(Make sure the Show Debug Tool bar is enabled in the View menu).
Now start debug mode by pressing the  icon in
the debug tool bar. Now use the debugger controls to execute the
scenario and watch the task result in the right area of the
display.
icon in
the debug tool bar. Now use the debugger controls to execute the
scenario and watch the task result in the right area of the
display.
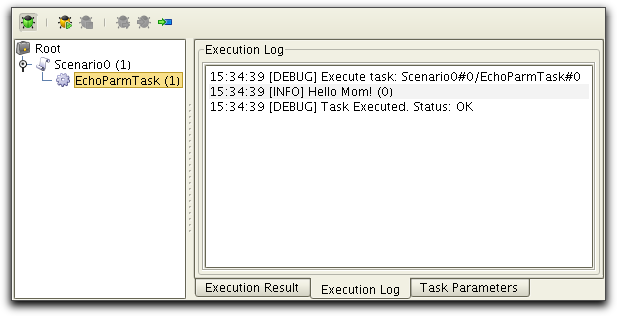
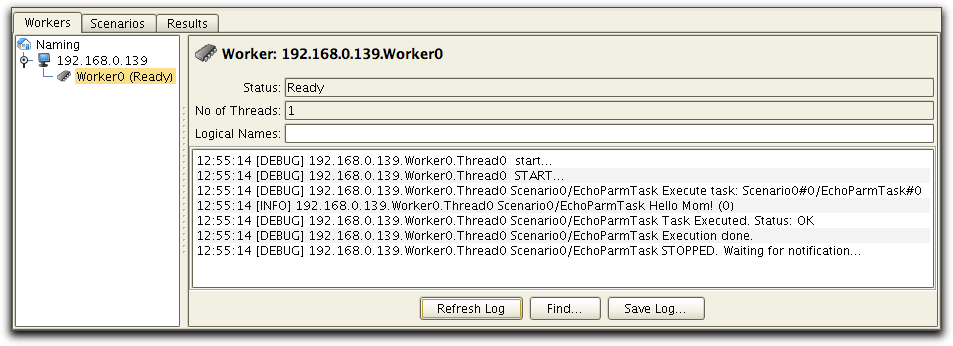
This simple tests illustrates the EchoParmTask that echoes the
message string in the execution log. Further details about the
scenario editor is described in the Scenario
Editor User's Guide.
The following sections covers in depth details about the various mechanisms that can be used when developing tasks.
Logging is performed using the TaskRuntime object that is passed as argument to the execute() method in the Task interface:
| void execute(TaskRuntime runtime, TaskResultHandler trh) throws TaskExecuteException; |
The TaskRuntime interface offers the following log methods:
| /** All logging level. */ public static final int LOG_ALL = Log.ALL; /** "Debug" level logging. */ public static final int LOG_DEBUG = Log.DEBUG; /** "Info" level logging. */ public static final int LOG_INFO = Log.INFO; /** "Error" level logging. */ public static final int LOG_ERROR = Log.ERROR; /** No logging level. */ public static final int LOG_OFF = Log.OFF; void log(String msg); void log(int level, String msg); void log(int level, String msg, Object params); void log(int level, String msg, Object params[]); void log(int level, String msg, Throwable thrown); |
The following example illustrates how to log output in the execute() method:
| public void execute(TaskRuntime rt, TaskResultHandler trh) throws TaskExecuteException { rt.log(TaskRuntime.LOG_INFO, "This is an information entry"); rt.log(TaskRuntime.LOG_DEBUG, "This is an debug entry, with parameters: {0} {1}", new Object[]{"param1", "param2"}); } |
Note that the last example uses java.text.MessageFormat style
formatting to format parameters. See you java documentation for
details.
The following sections show where the log messages appear in the
various Pure Performance applications.
Log Messages in PureTest
The PureTest application supports execution of tasks in the
Scenario Editor Debugger and so all log entries are reported
there:
Log Messages in PureLoad
PureLoad includes two runtime environments that executes
scenarios of tasks:
The Scenario Editor Debugger is the same as in the PureTest application. See Log viewer in PureTest for details.
The log output during a load test session is presented in the Worker Log. This log keeps the log output for all worker threads assigned to a specific worker. View the worker log from within the PureLoad Console, Workers tab. Select a worker object in the tree and all log entries will be presented in the panel to the right.
Java Exceptions are used to report errors when the task execute()
method is executed. Use the
com.pureload.task.api.TaskExecuteException.
The following example shows how a task error can be communicated using the TaskExecuteException:
| public void execute(TaskRuntime rt, TaskResultHandler trh) throws TaskExecuteException { Socket s = null; try { s = new Socket(serverAddress, serverPort); // do task work with server ... } catch (IOException e) { throw new TaskExecuteException("failed to communicate with server", e); } finally { if (s != null) try { s.close(); } catch (IOException ignored) {} } } |
Tasks might use third party API's or toolkits which are used to perform the actual server calls. All errors that are reported from the API or toolkit should be handled in the task and when apropriate re-thrown as a TaskExecuteException.
The following sections illustrates where failing task errors are reported in respective application.
Execution Result in PureTest

Failed Tasks in PureLoad
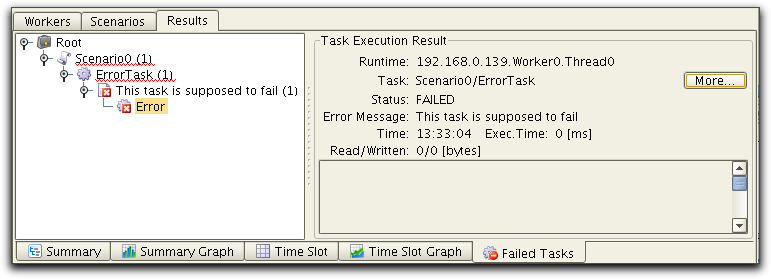
A task that throws TaskExecuteException will be indicated as Failed in the PureLoad Console. The Failed Tasks tab in the console will also list all tasks that fail with information about the actual message that was passed to the TaskExecuteException.
The following figure shows an example of what is displayed in the Failed Tasks tab when a task has thrown a TaskExecuteException:
The Task interface extends the java.io.Serializable interface. This means that all Task implementations must fulfill the Serializable contract. All task class attributes must also be Serializable.
Task Parameters defines what parameters that can be altered by the user in the application's user interface. The task parameter functionality is based on parts of the JavaBeans specification and a task developer must consider a few rules to accomplish support for task parameters.
Task parameters are extracted using the task itself and the accompanying BeanInfo class. This process is called the "Verification" process.
In this section we extend the example used in the previous section
and implement two classes, EchoParmTask and EchoParmTaskBeanInfo.
In our example task, EchoParmTask, we now add methods to set and get the message to be displayed. We also store the message string as member data. The changes are:
| /** Instance variable, holding the message to be used */ private String message; /** Execute the task */ public void execute(TaskRunTime rt, TaskResultHandler trh) throws TaskExecuteException { System.out.println(message); } public String getMessage() { return message; } public void setMessage(String message) { this.message = message; } |
Both the get() and set() method must be implemented. Only having
one will cause an error when the task is loaded into the
application.
The currently supported data types for task parameters are the following:
| Data Type |
Size |
| java.lang.String |
unlimited text data |
| java.lang.StringBuffer |
unlimited text data |
| java.lang.Integer |
-2147483648 to 2147483647 |
| java.lang.Long |
-9223372036854775808 to
9223372036854775807 |
| java.lang.Float |
1.40129846432481707e-45 to
3.40282346638528860e+38 |
| java.lang.Double |
4.94065645841246544e-324 to
1.79769313486231570e+308 |
| java.lang.Boolean |
true or false |
| com.pureload.task.api.KeyValueVector |
see Javadoc API information
(provided with PureLoad) |
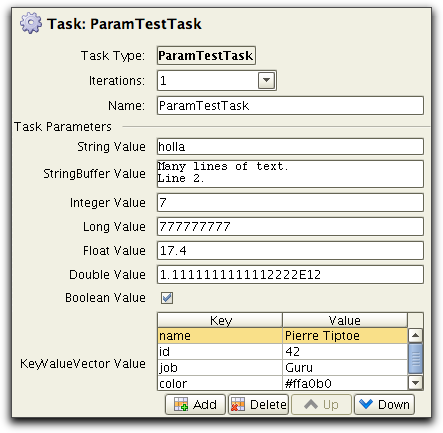
Each declared task parameter will appear in the properties panel of a task. The following figure shows how each of the supported data types are represented in the scenario editor:
The BeanInfo class is named after the Task class it represents
and must end with the suffix BeanInfo. It contains information
about all task parameters and their characteristics. It also
contains a description of the task that can be viewed in the
PureLoad Console.
The BeanInfo class for our example task:
| package examples.tasks; import java.beans.*; import com.pureload.task.api.*; /** BeanInfo for the EchoTask */ public class EchoParmTaskBeanInfo extends TaskBeanInfo { /** Task class we operate on */ private final static Class beanClass = EchoParmTask.class; public PropertyDescriptor[] getPropertyDescriptors() { addTaskParameter(beanClass, "Message", "Message", "Message string to log", "Hello Mom!"); return getBeanProperties(); } public BeanDescriptor getBeanDescriptor() { BeanDescriptor bd = new BeanDescriptor(beanClass); bd.setValue("description", "Echo Messages to log"); bd.setValue("classInfo", "Echo the specified message to log."); return bd; } } |
The base class TaskBeanInfo
must be subclassed when creating a BeanInfo for a Task.
TaskBeanInfo provides a convenience method for creating the
necessary PropertyDescriptor array:
| /** * Convenience method to add a task parameter. * * @param beanClass class object for the target bean * @param parameterName name of the task parameter * @param displayName display name of the task parameter * @param shortDescription short description (tool tip text) * @param defaultValue default parameter value * @throws TaskParameterException if the supplied values are not * valid for the taskClass */ protected void addTaskParameter(Class beanClass, String parameterName, String displayName, String shortDescription, Object defaultValue) |
In the next figure you can see how the newly added task parameter
will appear in the PureLoad Console:
Default Task Parameters
Currently all tasks have a Timeout
parameter as default. This is used to terminate the execution of a
task if it has not completed within the specified time in
milliseconds. It can be useful if a task hangs because of a server
not responding or similar.
The timeout task parameter is useful for the majority of the
tasks. There are however tasks where the timeout task parameter
does not make sense. Include the following as the first statement
in the getPropertyDescriptors() method to remove the time out.
| public PropertyDescriptor[] getPropertyDescriptors() { removeBeanProperty(TaskBeanInfo.TIME_OUT_PROPERTY); // ... } |
BeanDescriptor
The bean descriptor is
used to specify general information about the task. If the task
has any constraints with other tasks or if the task sets up the
environment for other tasks then it should be specified in the
bean descriptor. The information can be viewed in the scenario
editor in the Task Types tab when selecting a task.
| public BeanDescriptor getBeanDescriptor() { BeanDescriptor bd = new BeanDescriptor(MailSendTask.class); bd.setValue("description", "Send mail using SMTP"); bd.setValue("classInfo", "This task is used to send a mail, using SMTP.\n\n" + "Must be preceded by MailConnectTask in a task " + sequence."); return bd; } |
Implementing the getBeanDescriptor() method is optional. A good
recommendation is however to implement it since it gives the user
more information about a task and how to use it correctly.
Tasks might need to interoperate with each other in order to pass
data, set up the environment, etc. during a load test. There are
two contexts in which the tasks can interoperate with each other:
The runtime attribute mechanism is used to pass data between
tasks while they are executing. The scope for a runtime attribute
is among all threads running in a JVM. (It is not possible to
share data between JVM's, not even if they are executing on the
same physical machine). Runtime attributes can only be used in a
task's execute() method.
| import com.pureload.task.api.*; /** Simple task to show the use of runtime attributes */ public class LogTask implements Task { private LogHandler logHandler; /** Called in a worker thread */ public void execute(TaskRunTime rt, TaskResultHandler trh) throws TaskExecuteException { logHandler = (LogHandler) rt.getRuntimeAttribute("LOGGER"); if (logHandler == null) { logHandler = new LogHandler(logFile); rt.setRuntimeAttribute("LOGGER", logHandler); } // ... logHandler.logMessage("Hello there.."); } } |
The runtime ensures that only one thread concurrently can modify
a runtime attribute within a JVM.
The following methods are available in TaskRuntime
for handling runtime attributes:
| void setRuntimeAttribute(String key, Object value); Object getRuntimeAttribute(String key); void removeRuntimeAttribute(String key); void clearRuntimeAttributes(); Iterator listRuntimeAttributeNames(); void clearRuntimeAttributes(); |
The scenario attribute mechanism can be used to pass information
from one task to another while executing in the runtime. It works
similar as a runtime attribute with the difference that it is the
Scenario context that maintains the attributes.
Again we use the EchoParmTask example and extend it to show a
message (specified by a parameter) suffixed with an Integer that
is increased by 1 for each instance of the task that is executed.
| import com.pureload.task.api.*; /** Simple task to echo a message to stdout */ public class EchoParmTask implements Task { /** Instance variable, holding the message to be used */ private String message; /** Execute the task */ public void execute(TaskRuntime rt, TaskResultHandler trh) throws TaskExecuteException { // Get task count from sequence attribute int count = 0; Integer countObj = (Integer) rt.getAttribute("count"); if (countObj != null) { // Count object found count = countObj.intValue(); } // Print message with count System.out.println(message + " (" + count + ")"); // Increment count and set sequence attribute count++; rt.setAttribute("count", new Integer(count)); } } |
The following methods are available in TaskRuntime for handling
scenario attributes:
| void setAttribute(String key, Object value); Object getAttribute(String key); Object removeAttribute(String key); void clearAttributes(); Iterator listAttributeNames(); void clearScenarioAttributes(); |
A real world example that uses scenario attributes are the tasks
that establish some kind of connection with the server application
and the succeeding tasks operates on that connection. (See the
JDBC tasks).
Note: The scenario attribute mechanism only works within the
context of a scenario. Attributes can not be shared across other
scenarios or other runtime environments.
Scenario variables are similar to scenario attributes but have
the ability to be referenced in a task parameter using the syntax
${variable-name}.
Variables are textually substituted at runtime with their actual
values. A task programmer can access variables using the following
methods in
TaskRuntime:
| String getVariable(String name); String setVariable(String name, String value); String removeVariable(String name); Iterator listVariableNames(); void clearVariables(); |
A good example of variable usage is in the ExtractTask where a
substring is extracted and stored in a variable for use in the
task parameters of subsequent tasks.
The task execution timer is started automatically by the
application when a tasks execute()
method is called and it is stopped when the method is finished. It
is possible to manually manage the timer within the task. The
following calls can be used anywhere in the execute() method and as many
times as needed:
| public void execute(TaskRuntime tr, TaskResultHandler trh)
throws TaskExecuteException { // ... // Pauses execution time measurement. Can be used by task // subclasses that will pause time measurement during parts that // are not considered of interest. trh.pauseTimer(); // ... // Resumes execution time measurement. Used to resume after a call // to pauseTimer trh.resumeTimer(); // ... } |
In addition task execution time may be reported using the method reportExecuteTime() in TaskResultHandler:
| void reportExecuteTime(long time); |
This is typically used when a task don't uses the execution timer.
Counting the number of bytes that is transferred between the
runtime environment executing a task and the actual server
application is something that has to be manually implemented in
the task. The application can present and report this information
but only for tasks that explicitly report the number of bytes read
and/or written.
Since counting the number of bytes can give a performance penalty,
it is possible to turn byte counting on and off. A task can query
the current setting for byte counting using the shouldCountBytes()
method in TaskResultHandler.
Here follows a typical example on how counting bytes could be
used:
| public void execute(TaskRuntime tr, TaskResultHandler trh) throws TaskExecuteException { if (!trh.shouldCountBytes()) { // perform execute without counting bytes } else { int bytesRead = 0; int bytesWritten = 0; // perform execute and count bytes. trh.reportBytesRead(bytesRead); trh.reportBytesWritten(bytesWritten); } } |
In some situations it might be impossible to count the number of bytes transferred. An example is a task that calls a third party API which do not offer any mechanism to get the number of read or written bytes.
The transaction mechanism is basically a counter that can be set
by a task which the application will present in the result
presentation. This might be useful if a task issues several
requests to a server application or API and want to express this
in the result presentation.
Use the reportNumTransactions() method in TaskResultHandler
to report the number of transactions.
| public void execute(TaskRuntime tr, TaskResultHandler trh) throws TaskExecuteException { trh.reportNumTransactions(3); } |
In some situations it is not desirable to present the result from
a task. Tasks that fit into this category might for example
contain calls that set up the environment for all threads in a
worker, enable various trace levels, etc. Enabling that a task
shall not be handled in the summary will silently drop it. (Any
output produced using the log functionality and System.err and
System.out streams will however work as usual).
The generic HttpInitTask is a real world example of a task that do
not report results. It is used in a scenario to define for all
succeeding HTTP tasks in the scenario that HTTP cookies are
enabled or disabled, if basic authentication is used, various
debug levels, etc. Having this task reported among the load
execution results would only confuse the user.
Insert the following call somewhere in the tasks execute() method
to disable the task in the result summary:
| public void execute(TaskRuntime tr, TaskResultHandler trh) throws TaskExecuteException { trh.reportEmpty(); } |
Some tasks perform operations that need to pass some sort of
output onto the succeeding tasks. This can for example be a HTTP
request that fetch the source of a HTML page or a database task
that fetch a result set from a database.
The following methods in TaskResultHandler
are used to pass data:
| void setCustomData(Object customData); void setStringData(StringBuffer stringData); |
Once data has been set, it becomes available for following tasks
until it is overwritten. The data can be accessed by calling the
following methods in TaskResultHandler:
| public Object getCustomData(); public StringBuffer getStringData(); |
The Java Native Interface (JNI) is the native programming
interface for Java that is part of the JDK. The JNI allows Java
code that runs within a Java Virtual Machine (VM) to operate with
applications and libraries written in other languages, such as C
or C++.
Since PureLoad Tasks is written in Java, this also means that JNI
can be used to create tasks which executes native code. To
understand this section you should be familiar with the basic
concepts in JNI.
This section gives a simple example s on how JNI can be used
together with PureLoad. The example is only to show the basics and
a kind of proof of concept. Experienced JNI programmers may use
more advanced JNI techniques to implement PureLoad tasks.
You will find all source files used in the examples in <install-home>/examples/tasks/jni.
The following example assumes that Linux is used, but the step
are similar on other platforms. See the JNI documentation for
details.
The simplest form of handling native code is, as done in the
simple example task EchoParmJniTask.java, to declare a native
method:
| /** Declaration of native printout method */ private native void echo(String message); |
The echo() method simply echoes the provided string to stdout. You must also provide a native implementation of the execute method. The file EchoParmJniTask.cc consist of the following implementation done in C.
| #include "EchoParmJniTask.h" JNIEXPORT void JNICALL Java_examples_tasks_jni_EchoParmJniTask_echo(JNIEnv* env, jobject thisObj, jstring str) { jboolean isCopy = JNI_FALSE; const char* utf_string = env->GetStringUTFChars(str, &isCopy); printf("%s\n", utf_string); fflush(stdout); } |
The execute method of EchoParmJniTask simply calls the echo
method as follows:
| public void execute(TaskRuntime runtime, TaskResultHandler
resultHandler) throws TaskExecuteException { // Get task count from sequence attribute int count = 0; Integer countObj = (Integer)runtime.getAttribute("count"); if (countObj != null) { // Count object found count = countObj.intValue(); } // Print message with count using native code echo(message + " (" + count + ")"); // Increment count and set seqence attribute count++; runtime.setAttribute("count", new Integer(count)); } |
After you have implemented the Java and the C implementations you must compile the Java source file EchoParmJniTask.java.
| # javac -d <install-home>/extensions/classes
examples/tasks/jni/EchoParmJniTask.java |
Then generate the JNI header file. Make sure that you have the CLASSPATH set so that EchoParmJniTask.class can be found by javah.
Note: Make sure that $INSTALL_HOME/lib/task-1.1.jar is included in your CLASSPATH to be able to generate header files.
| # javah -jni -o EchoParmJniTask.h examples.tasks.jni.EchoParmJniTask |
This command creates the file EchoParmJniTask.h which should be included in the native implementations, as in the above example.
Now compile the C file and create a shared library:| # gcc -o libecho.so
src/examples/tasks/jni/EchoParmJniTask.cc \ -shared -fpic -I$JAVA_HOME/include -I$JAVA_HOME/include/linux |
The created library that was created above must be loaded. This is done using the static method System.loadLibrary(String <libname>). The best way to do this is to create a task for this purpose. Following this recommendation ensures that the execution time will not include the time for loading the library (see the LoadJniLibTask task and its bean info class).
Set the $LD_LIBRARY_PATH to include the location of these libraries and you are ready to create a scenario containing the LoadJniLibTask and the HelloJniTask and run the tasks.
All sample code presented in this guide is available in <install-home>/examples directory.