Scenario Editor
January 2015
support@pureload.com
Scenario Editor |
|
| PureTest
5.2 January 2015 |
http://www.pureload.com support@pureload.com |
This chapter describes how scenarios and tasks are defined and
also the various features related to scenario management in the
scenario editor.
Scenarios of tasks is the common structure used throughout all
applications in the Pure Performance suite. A task is the actual
function that will be performed, i.e get a web page, insert data
into a database, etc. A series of tasks are defined in a scenario.
An extensive set of features is available to make tasks modular
and dynamic.
A scenario in the Pure Performance suite consists of task
sequences and tasks. The purpose with the scenario is to assemble
all tasks as they are going to be executed in any of the run time
environments. I.e PureLoad, PureAgent or PureTest.
Task sequence is basically a container that groups other task sequences and tasks. An example is a web application where a scenario shall include requests to many web pages with their specific HTML pages and graphics. All requests for a complete HTML page is in this example grouped in a task sequence:
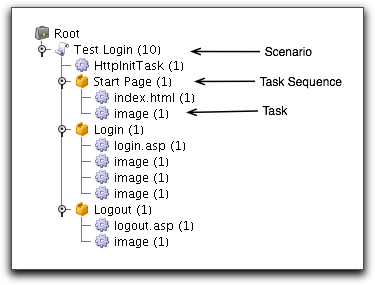
Here we have a Scenario (Test Login) that consists of tree task
sequences, one per web-page (Start Page, Login and Logout). Each
of the task sequences consist of tasks that represent one HTTP
request.
Once the PureLoad Console or PureTest application has been
started a window similar to the following appear. It consists of
one main tab, Scenarios
which have tree sub tabs at the bottom of the screen:
The left pane shows the managed scenarios in tree structure. The
tree can maintain several scenarios concurrently. The menu items
and tool bar buttons are used to manage the content of the
scenario tree. Selecting an object in the tree displays the
characteristics of the object in the properties panel to the
right.
The scenario tree presents objects by the value of the Name
parameter. The number within parentheses indicates the number of
iterations that will be executed. The Sequences/Tasks information
below the tree indicates the following:
Note: There is basically no difference between a scenario and a task sequence object. Scenarios can however only be defined on the top level and may also define a distribution. Scenarios are also the object type that is executed in the runtime environment.
The Name parameter that can be specified in the property panel
for scenario, task sequence and task objects need some extra
attention. Name is primarily used in the scenario editor and in
the result presentation. Its default value is the same as the
selected task class but can be specified to anything meaningful.
Name is also used when PureLoad visualizes the tasks in the the
result presentation. All tasks with the same name per scenario or
task sequence will be presented as one task in the result
presentation.
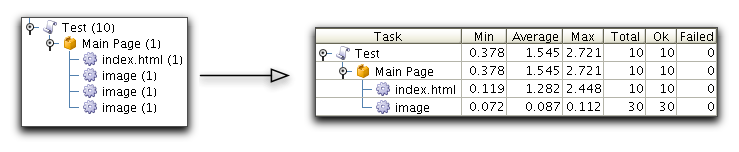
An example is a scenario for load testing of a web site. The
scenario to the left will give a result tree as shown to the
right:
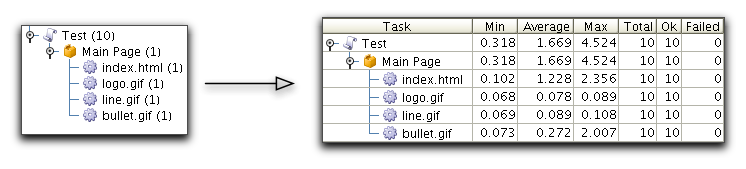
If we are not interested in individual results for the image
URLs, we can name these tasks "image" and the results will be
displayed as:
Create a new scenario by selecting the Root node in tree and
select Edit->Create Scenario or use the  button
in the tool bar:
button
in the tool bar:
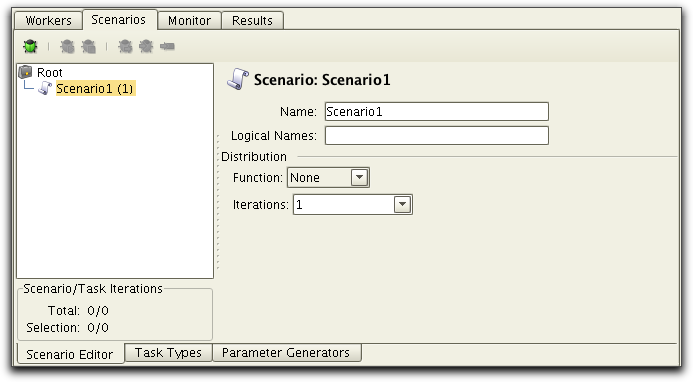
Selecting the newly created scenario in the scenario tree shows
the properties for the scenario in the right area. The properties
are:
A task sequence is a container in which tasks and other task
sequences can be grouped. There is no limit on the depth of a
scenario tree.
Select the object in the scenario tree into which the task
sequence shall be added and select the Edit->Create Task Sequence menu option. If the
currently selected object in the tree is a scenario or task
sequence then the newly created task sequence will be added as a
child object. If a task object is currently selected then the new
task sequence will be created below the selected task object:
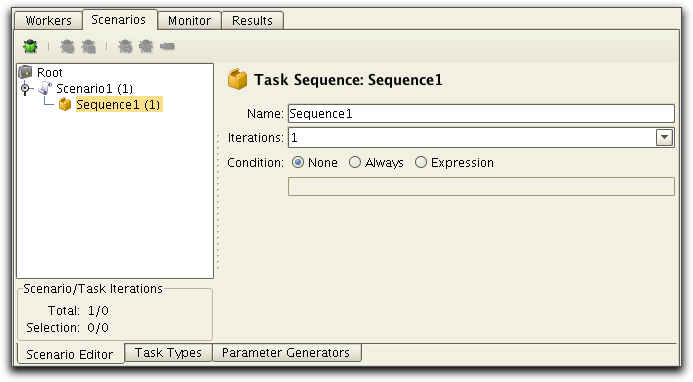
Selecting the newly created task sequence in the scenario tree shows the properties for the task sequence in the right area. The properties are:
Tasks are added either to a scenario or a task sequence. Select
the Edit->Create menu
choice to create a new task. If the currently selected object in
the tree is a scenario or task sequence then the newly created
task will be added as a child object. If a task object is
currently selected then the new task will be created below the
selected task object.
Note: The tool bar button creates
an object in the tree according to the current selection. If the
selection is either a scenario, task sequence or task object then
the new object is always a task.
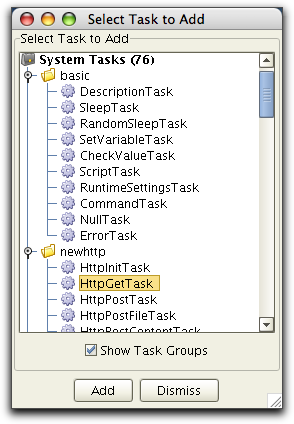
The following dialog lists the Task Types to choose from. Select a task in the list and press Add or double click to add the task type.
The added task will now appear in the scenario editor:
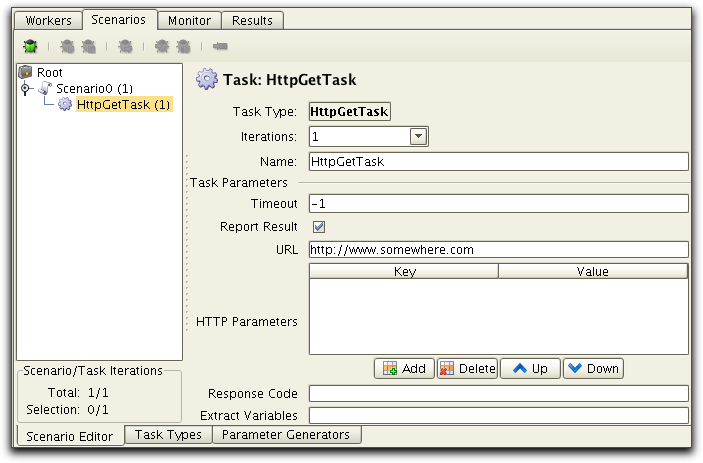
All tasks have task parameters. These are grouped into generic
task parameters and task specific parameters. All tasks have the
following generic parameters:
All tasks are using the task parameter mechanism. Task parameters
defines the input interface for the task and the actual values are
specified in the scenario editor. Task parameters might be of
different types and are displayed different depending on type.
The value for all task parameters can automatically be defined
using task parameters generators
and/or variables.
You can undo and redo up to 25 edits in the scenario tree. Edits
include edits of parameters for a node, added tasks or sequences
etc.
To undo or redo an edit, select Undo/Redo in the Edit menu or use
Scenarios of tasks are normally executed in any of the Pure
Performance suite applications. This can be PureLoad for load
testing, PureAgent for performance monitoring or the PureTest
application itself. This section describes how to execute tasks
from within the Scenario Debugger in the PureTest application.
The main purpose with the Scenario Debugger is to quickly test
and verify each individual task in a scenario. This is done by
single stepping through each task in a scenario. Detailed
execution results and execution log is shown for each task.
The debugger mini tool bar is displayed by selecting the View->Show Debug Toolbar
menu choice (if not already displayed) and its control buttons
will appear in the Scenario Editor sub tab:
The following operations are available in the debugger tool bar:
 Toggle debug/edit mode
 Start debug session
 Stop execution
 Continue/Start
execution
Continue/Start
execution Single step
 Step Over
(skip)
Step Over
(skip) Toggle breakpoint
Make sure debug mode is enabled (use the button
in the debug tool bar).
Now press the button to start the debug
session. This operation moves the execution pointer to the first
task in the scenario which is indicated by the task pointer icon (![]() ). This pointer
indicates that the task is going to be executed during the next
Single Step (), Step Over () or Continue () operation.
). This pointer
indicates that the task is going to be executed during the next
Single Step (), Step Over () or Continue () operation.
The task execution result is presented to right of the scenario
tree:
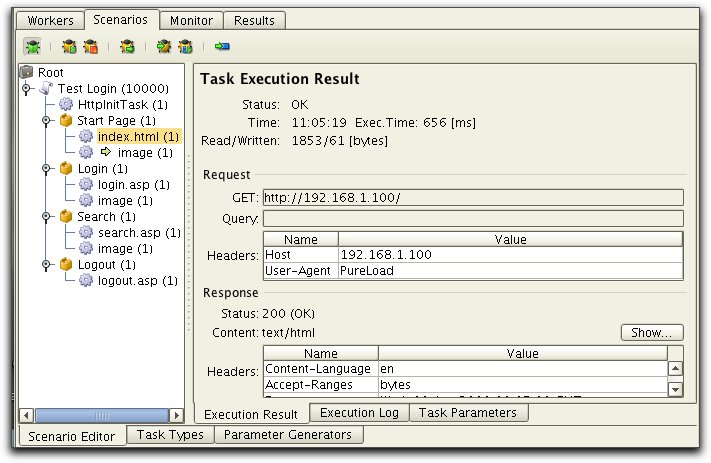
Now you can continue to step trough the scenario analyzing the results from each task executed.
Scenarios are often designed so that they can be parametrized and
repeated many times with different data. The parameter generator
mechanism makes this possible. Each task parameter value can refer
to parameter generators to have the actual value generated during
the test.
The following parameter generator types are available:
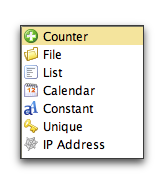
Parameter generators have five operations that they can
perform:
Before assigning a parameter generator to a task parameter it
needs to be created and configured. This is done in the Parameter
Generators sub tab.
Select the Internal node and use View->Create or the button in the tool bar to create a
new internal parameter generator. This will bring up a dialog with
the available parameter generator types.
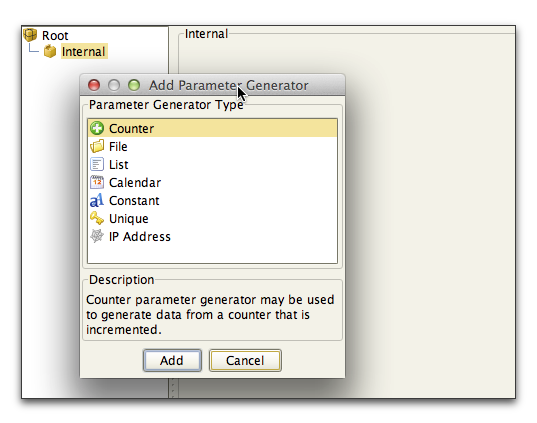
Double click on selected parameter generators or press Add to
create it. All parameter generators have a Name parameter that
must be unique. It is recommended to set a name that match the
purpose with the parameter generator. For example User ids,
Cities, Models, etc.
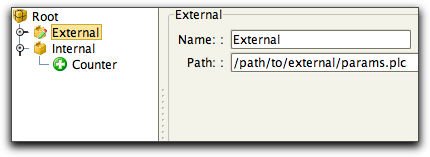
To create a new external parameter file or open an existing
external parameter generator file, select the Root node and use
View->Create or the  button. Parameter generators can be added and removed to external
nodes in the same way as for the internal node. Changes in
external parameter generator files can be saved when the whole
scenario is saved.
button. Parameter generators can be added and removed to external
nodes in the same way as for the internal node. Changes in
external parameter generator files can be saved when the whole
scenario is saved.
The counter generates numbers within specified boundaries.
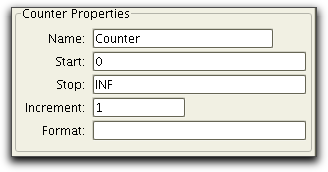
Start and Stop defines the range. The special constant INF is
used for infinity (i.e the maximun number that can be
represented). The Format parameter may be used to format the
generated number.
Typical examples are:
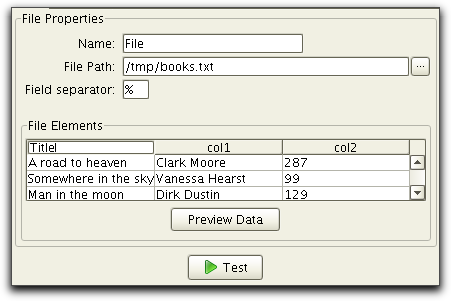
The file parameter generator read values from a file. The file
can either contain one value per row or several values per row.
Several values per row must be delimited with a character that is
used to split the values into Elements. The file below contains 6
rows, each with 3 elements separated with a "%" character.
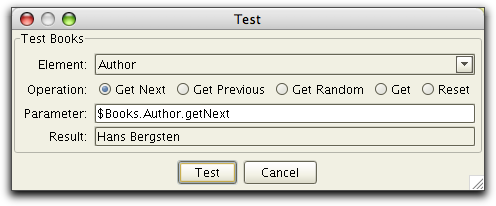
| A road to heaven%Clark Moore%287 Somewhere in the sky%Vanessa Hearst%99 Man in the moon%Dirk Dustin%129 Java Server Pages%Hans Bergsten%199 Gagarin: a myth%Roland Petersson%19 Sun, Moon, Earth%Laura Craft%78 |
The following figure shows the properties for the file parameter
generator. The books.txt
file has been loaded and the Preview Data button has be pressed.
Since the specified Field
Separator matches the separator in the file will three
columns appear in the grid each representing the values in the
file. The name of each element can be changed by clicking on the
table header and it is those names that are used to access the
parameter generator elements in a task parameter.
File Path:
The location of the parameter file, i.e. the "File Path",
can be given in four different ways:
When using a relative file path ($PLC, $USERHOME, $PUREHOME) be
sure to save the .plc file before attempting to test or preview
the data, or else the parameter file may not be found.
Accessing the parameters:
The following syntax is used in a task parameter to access a
element in a file parameter generator:
| $Books.Prices.getNext $Books.Authors.getNext |
If having several elements defined for a file parameter generator
then each of these are managed separated from another. I.e doing a
$Books.Prices.getNext will
only forward the row pointer for that specific element and not for
any other.
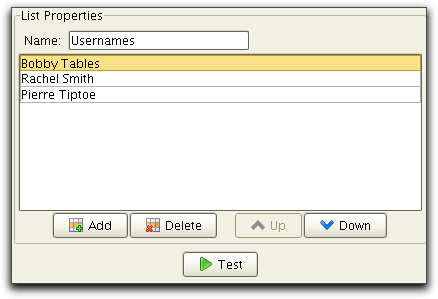
The list parameter generator is handy when a small list of values shall be read. The management of the list is done in the List parameter generator options pane.
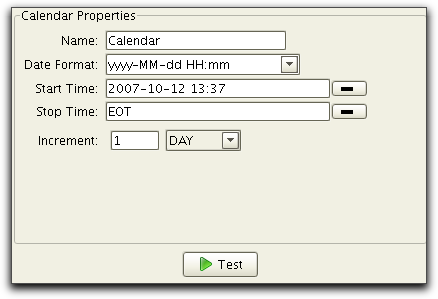
The calendar parameter generator is useful when generating timestamps values. The generator can be configured to increase parts of the timestamp between each getNext operation.
Having a Date Format set to yyyy-MM-dd HH:mm and Start Time set to 2007-10-12 13:37 and Increment set to 1 Hours will cause each use of the getNext operation to return the following values:
| 2007-10-12 13:37 2007-10-12 13:38 2007-10-12 13:39 etc. |
The Date Format lists a few standard formats but it can be manually edited to accommodate custom patterns.
The Unique parameter generator can be used to generate a random unique identifier in standard GUID/UUID format. Using getNext will give you (for example) the following values:
| 3cdeab54-2b6a-4fe1-bfac-b1fbe0284266 e5a01b89-61f8-45a9-b1fb-f4c8f70d38a2 53e2e70c-2c65-4b52-97af-3bab4472e2d6 etc. |
Using get operation will retreive the last used value; all other
operations generates a new unique identifier.
The IP Address parameter generator can be used to generate IPv4
and IPv6 IP Addresses. This is done by specifying an IP Address
range. Optionally a regular expression may also be used to exclude
addresses from this range.
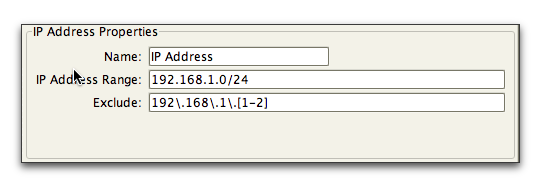
The above will generate IP addresses starting with 192.168.1.3 to
192.168.1.254.
IP Address Range may be specified using CIDR format or an range
(from-to).
All generators can be tested using the Test button at the bottom of the pane. The following dialog is displayed for all but File generators.
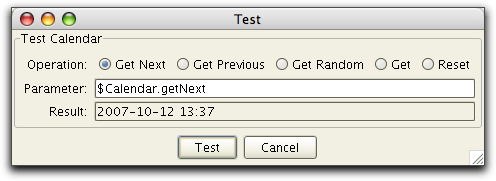
The main difference between the test dialog for file parameter generators is that an element (column) may be selected.
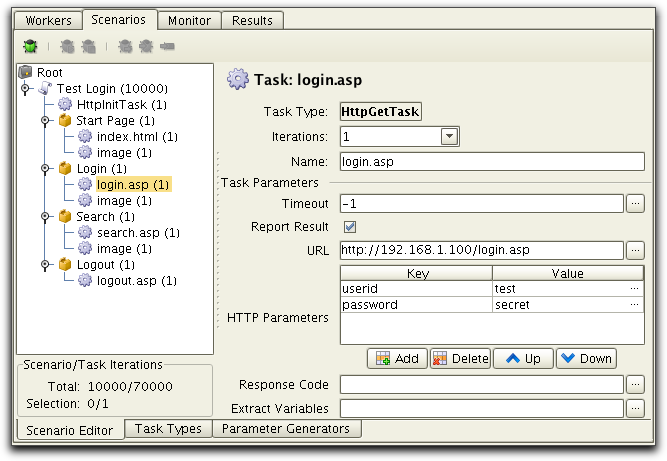
A powerful feature when testing a dynamic application is to extract information from a task, save his information to a scenario variable and use defined variables in subsequent tasks.
Variables can be used in any task parameter. The syntax of a
variable is:
| ${variable-name} |
where the value, if any, of variable-name is substituted before
the task is executed. A task parameter value can mix static text
with variables and also contain more than one variable. Assume
that we have two variables defined itemno and itemcount, then we
could for example have a URL parameter to a HTTP tasks as follows:
| http://some.where.com/getItem?item=${itemno}&count=${itemcount} |
Variables values are set by Tasks. To assign a value to a
variable a task must be used. Normally this is done by extracting
part of data received from a previous task, using any of the
extract tasks available. The SetVariableTask can be used to
initialize a list of variables to either static or evaluated
values.
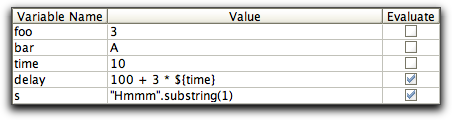
Evaluated values can use the same syntax as used by the ScriptTask
(Java BeanShell). In the above example, variable delay will be
evaluated to 130 and variable s will be set to the string "mmm".
The most common use of variables is when testing a dynamic web application. Please read more about testing web applications in the Testing Web Applications guide. Using the generic extract task it is possible to extract data and assign a value to a variable from any task that returns data. This includes Telnet, FTP, Mail and JDBC tasks.
Task sequences can have a condition which determines if the
sequence should be executed or not depending on previous errors or
an execute condition expression.
A scenario is normally executed task by task from beginning to end. The default behavior is to ignore errors in individual tasks and continue execution. By using the RuntimeSettingsTask the runtime settings flag "Stop On Error" can be set to false, to force the whole scenario execution to end in case of a task error.
However, sometimes it is important to execute certain tasks to perform cleanup even if an error has occurred. For this purpose, the "Stop On Error" can be overridden for a task sequence by setting the task sequence execute condition to "Always". All tasks and sub-sequences under a task sequence with condition "Always" will be executed regardless of previous errors.
Given the following scenario:
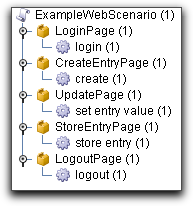
Now imagine that the CreateEntryPage results in an error. With
"Stop On Error" set to false, the execution will continue after
the error and cause the UpdatePage and the StoreEntryPage to fail
as well, since no entry was created.
If we want only the initial error to be reported as an error this
can be accomplished by setting "Stop On Error" to true. The
scenario execution will then halt right after the task 'create'
has been executed. In this case the user never logged out and the
server will be left with a user session that must time out by
itself.
In order to both report only the initial error and perform logout,
the "Stop On Error" flag should be set to true and the LogoutPage
task sequence should be set to "Always". This will halt the
execution after the task 'create', but will be forced to resume
for the LogoutPage task sequence.
Task sequences can be executed conditionally by setting an
execute condition. An execute condition can be set to one of the
following:
Expressions are written using standard Java language syntax with
the addition of PureLoad variables. They must evaluate to the
primitive value true or
false. PureLoad variables
are automatically typed. Variables holding numerical values will
be typed as primitive double values. Variables holding
non-numerical values will be typed as strings (java.lang.String).
For example, let us say that the PureLoad variable ${foo} has a
value of "minq" and that ${bar} has a value of 17. Now the
following expressions will be evaluated as:
| Expression |
Value |
|---|---|
| ${bar} == 17 |
true |
| ${foo}.equals(�minq�) |
true |
| ${foo}.length() == ${bar} |
false |
| ${bar} > 0 &&
${bar} < 42 |
true |
| ${foo}.startsWith("m") |
true |
| ${foo}.indexOf("q") |
Error (not a boolean result) |
A task or a task sequence can have variable iterations instead of
a static number. This is done by entering a scenario variable
reference (for example ${foo}) in the Iterations field. The actual
number of iterations to execute will then be evaluated during
runtime when the scenario is executed. The variable must have an
integer value or an error will occur. There are two special
scenario variables set by the system which contains the current
task and sequence iteration value. These variables are called ${_taskiteration} and ${_seqiteration}. They start
at 0 (zero) for the first iteration and are then incremented for
each iteration.
Note: When
variable iterations is used, it is not possible to use any
Parameter Generator value inside that task or task sequence since
the number of values to generate would not be known.
The Replace Task Parameters dialog is a powerful way to replace
task parameter values for individual tasks or group of tasks. The
replace functionality can either search for matching task
parameter values or completely replace values.
Select the desired nodes in the scenario tree and select Edit->Replace Task Parameters.
All tasks that are included in the selected nodes will be subject
for replacement in the replace task parameter dialog:
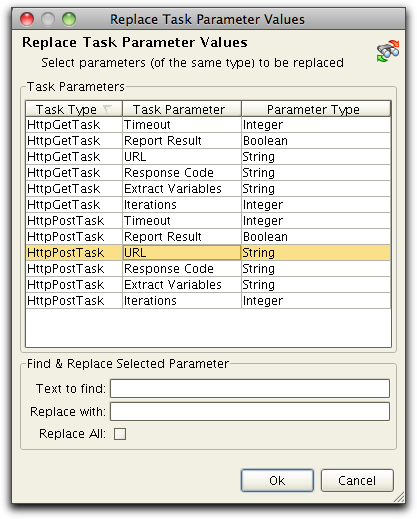
One or many task parameters (of the same type) can be selected
for replacement. If "Text to find" is specified, only task
parameters matching the specified text will be replaced. Select
the "Replace All" if all values should be replaced regardless of
what they are currently set to.
Example:
By selecting both URL task
parameters, the replace will operate on all URLs in the scenario:
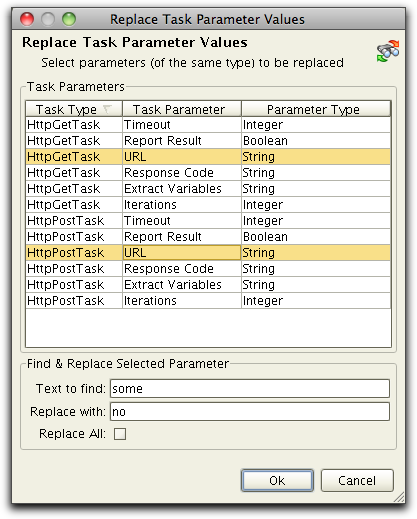
Let us say that there are two tasks (one HttpGetTask and one
HttpPostTask) with URL set to http://www.somewhere.com. The above replacement would replace
the 'some' with a 'no' so that the resulting URL becomes
http://www.nowhere.com.
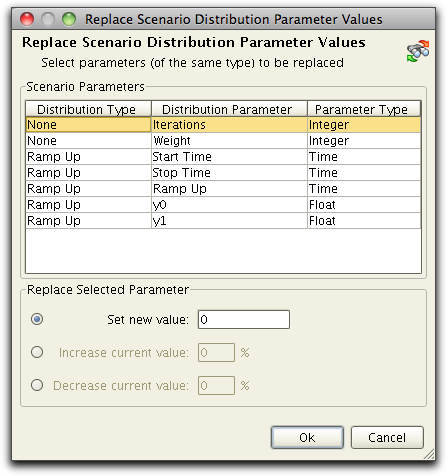
The Replace Scenario Parameters dialog can be used to change
distribution parameters in many scenarios. It is also possible to
make a percentage increase or decrease to distribution parameters.
Select the desired nodes in the scenario tree and select Edit->Replace Scenario Parameters.
All tasks that are included in the selected nodes will be subject
for replacement in the replace task parameter dialog:
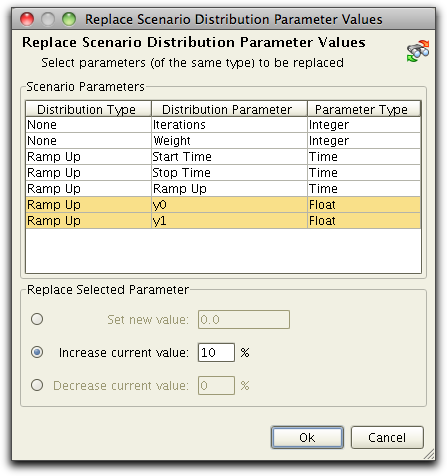
Example:
Making a
10% increase in the scenarios / s for all selected scenarios with
distribution Ramp Up can be done by selecting both y0 and y1:
Note: Scenario Distribution and the Function parameter for scenario objects is only applicable when using PureLoad.
Scenario distribution is controlled by a distribution function. A
distribution function defines how many times per second a scenario
should be executed and when the execution will start and stop.
Times are given as hours : minutes : seconds. There are a number
of different functions to choose from so that the total load test
traffic can best match the desired traffic model. It is also
possible to execute without any distribution function and instead
execute as fast as possible. The available functions are described
in detail below.
The combined distribution functions of all scenarios in a load
test make up the total distribution function. In order to execute
the load test exactly as specified by the total distribution
function, both the system under test and PureLoad itself must have
enough resources and be able to perform. Large systems tend to
have a certain inertia and will not respond to changes
immediately. Load tests should usually be performed over a long
period of time (at least 15 minutes up to many hours) for the
distribution to take effect.
If the system under test fails to perform fast enough to handle
the traffic, the load test results will start to differ from the
distribution function. In this situation, PureLoad can act in one
of two ways: either increase the number of scenarios per second to
try to force the exact number of scenario iterations to be
executed, or to keep on following the distribution function. Which
policy to use can be set in Tool
Properties -> Load Execution -> Distribution Policy.
When the distribution policy Exact Iterations is used, PureLoad will try to compensate and push harder if the system under test performs slower than the load test distribution function. The goal is to achieve the exact number of scenario iterations as defined by the distribution function. This means that the load test will not finish until all scenario iterations have been executed.
Example:
A scenario is set up to execute 10 per second for 20 minutes (1200
seconds with a total of 12000 scenario iterations), but the tested
system can only execute 5 scenarios per second. In this case the
load test would last 40 minutes until all the 12000 scenario
iterations have been executed.
For distribution policy Follow
Distribution, PureLoad will follow the distribution
regardless of how the system under test performs. The number of
executed scenario iterations will instead be less than defined by
the distribution function. Note that Follow Distribution can not
be used if any of the scenarios in the load test do not have a
function (set to function None) and in that case Exact Iterations
will be used instead.
Example:
Consider the same situation as the previous example with 10
scenario iterations per second and a tested system which can only
handle 5 scenarios per second. This time, the result would be that
the load test finishes after 20 minutes and the number of executed
scenario iteraions would be 6000.
When function is set to None, there is no function and the
specified number of scenario iterations will be executed as fast
as possible.

For scenarios without distribution (function None), it is possible
to specify a weight to control the ratio between all scenarios
without distribution and with the same logical name. A weight of 0
(zero) indicates that the scenario will be given an average
weight. The weight is usually used in combination with iterations
set to infinite. If a scenario with a limited number of iterations
finishes, the remaining scenarios will have their weights
re-calculated.
Ratio examples:
Note: If a certain ratio between scenarios is desired, it is recommended that weights are used in combination with infinite iterations and that all weights are set explicitly (avoid using 0) so that the resulting ratio can be easily understood.
The scenario instances will be executed as fast as possible
starting at Start Time.
The scenarios will be distributed in a linear way over time. For
example starting with 2 scenarios per second and ending with 5
scenarios per second. Note that it is not possible to set the
total number of scenarios executed by editing the Iterations
parameter. The iterations
parameter is calculated by the system using the defined
parameters. The calculated value is showed as "view only" in the
iterations field.
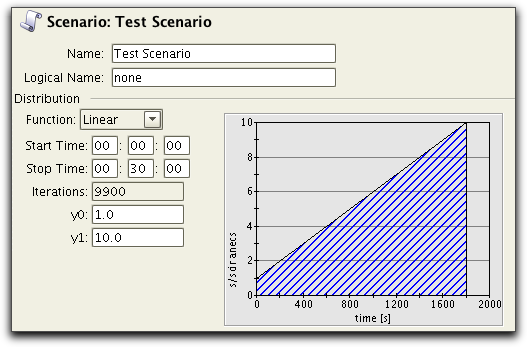
The example above shows:
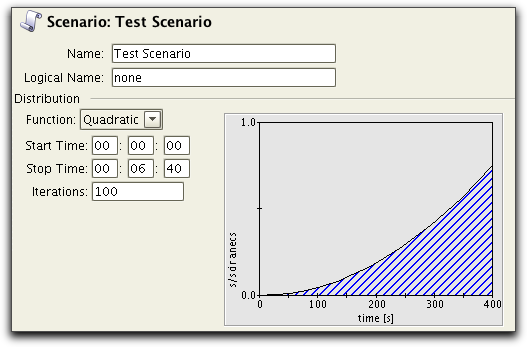
The specified number of scenarios will be distributed
quadratically starting at Start
Time.
This distribution function is used to distribute the scenarios
with a Normal function.
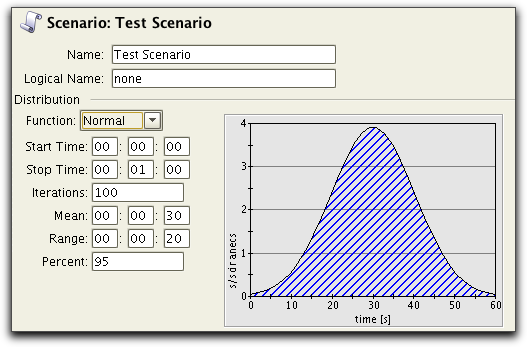
The parameters to set for this function are:
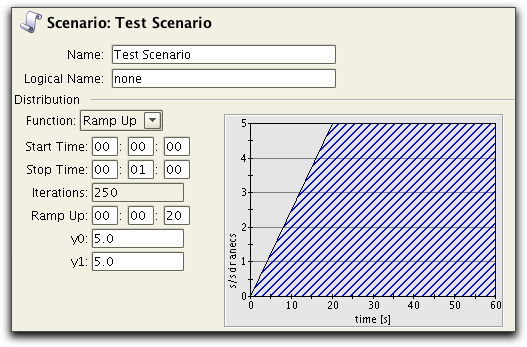
Ramp Up is similar to Linear, but it allows the load to start
from nothing and ramp up to a certain work level. The parameter
Ramp Up controls the duration of the ramp up from zero to y0
iterations per second.
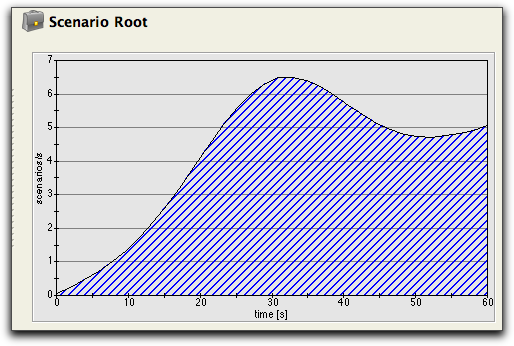
If you are using distributions for several scenarios it is
possible to view the summary graph of all the time distributions.
This is done by selecting the Root object in the scenarios Tab.
The example below models the load on a system where there is a
base load and an event occurs which causes a peak in the load
(this could be users arriving at the office after lunch and
performing some task on a server).