TRANSFERRING ADDRESSES
Transferring Addresses to Other Programs
Looking up and Searching for addresses is only useful if the data can be easily transferred to other programs - like word processors, spreadsheets or databases. Postcode Plus offers a choice of powerful ways to transfer data easily to almost any Windows program where it will be used:
This is the simplest way to transfer an address to your program, as you simply type a postcode into almost any Windows application, Robot does the rest. See Using The Robot for more details.
One of the easiest ways to transfer data is to use the Windows Clipboard.
Simply find the address you require, select it from the Results List, then select the Edit menu Copy option (shortcut key [Ctrl]+C). The selected address is copied to the clipboard, using the current settings and it is then available for pasting into your chosen program.
Move to your chosen program, then paste the address into position. Pasting will usually be carried out in your programs by using an Edit menu Paste option (shortcut key [Ctrl]+V) - but consult your program's documentation for further details.
Although this method requires almost no setting up - and may well be all you need for simple word-processing - there are more powerful methods of transferring addresses, which give you much more control of the process - including the format of the address.
The format of the address placed on the Clipboard can be adjusted using many of the Insert Settings, and Line Squeeze - see Insert Settings below.
The Label Tab provides a quick way of dragging addresses and barcodes to other Windows programs - like Microsoft Word.
To drag a barcode or address, simply hold down a [Shift] key, then click and hold down the LEFT mouse button on either the barcode or the address box of the label tab. Keep the mouse button down whilst dragging onto the target program (like Word), then release the mouse button to drop a copy of the barcode or address into that program.
Note that the Barcode is a graphical image - and you should ensure that your target program is able to receive and use graphical data, before dragging it there. The Royal Mail barcode is subject to a fairly strict specification of size and layout. You should ensure that your target program is set up to print the barcode to this specification.
Postcode Plus can pass address information to almost any Windows programs by simulating the typing of keystrokes into that program. You have full control over the order in which fields are typed into your program, and Postcode Plus includes a very powerful keystroke 'macro' language which enables Postcode Plus to control everything that happens during Insert - including the precise position of where each field will be typed.
A special Insert menu is provided to carry out the insert process, and when Postcode Plus starts up, it examines all the other programs currently running, and provides an entry in this menu for each one, along with a menu hot key 1-9 and A-Z.
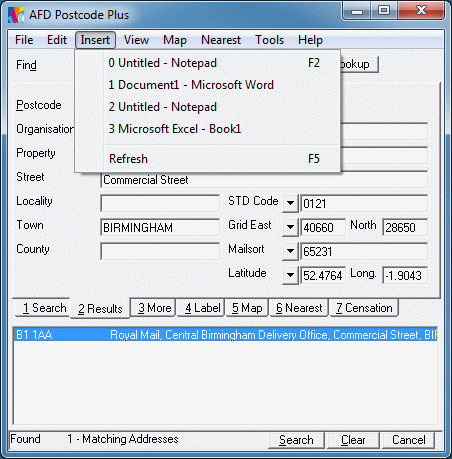
If your application was started after Postcode Plus was loaded, it will be necessary to refresh the Insert menu by selecting Insert Refresh (shortcut key [F5]). Note that it would be unhelpful to type addresses into some types of Windows programs - and Postcode Plus tries to ignore many of these.
To Insert an address, first select it from the Results List, then choose the target program from the Insert menu - and the address will be typed in according to the current Postcode Plus settings.
Use the Edit menu "Editable Results" option if you wish to be able to change the data on the results tab before inserting it into other applications. This menu setting is stored with the current settings file. If "Editable Results" is not checked, you cannot enter a new search request in the Results Tab. In this case if you type in any of the Results Tab boxes you will be returned to the appropriate box on the Search Tab.
Once you have carried out the first Insert, Postcode Plus remembers your target program, and makes a new entry at the top of the Insert menu - with a shortcut key [F2]. This means that future addresses can be inserted into this program simply by selecting an address, then pressing [F2].
For even faster Insert of addresses, once the first Insert has been completed, simply double-click an address in the Results List (this feature is not available if DDE is in use - see below).
The behaviour of Postcode Plus during Insert is controlled by settings for each application. Please see the section below that describes how to use the Wizard to configure Insert for your application.
Insert and Robot Settings Wizard
When Postcode Plus is first installed, it should Insert into most common programs - like Word or Excel - correctly. Postcode Plus has a very powerful keystroke 'macro' language, which can be made to control your target program, and the precise position of where the data will be typed.
To configure an application to work with Postcode Plus, select the 'Insert / Robot Setup' option from the File menu.
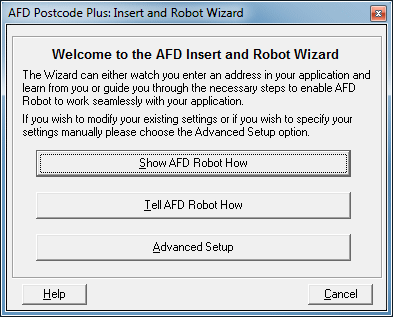
Show AFD Robot How
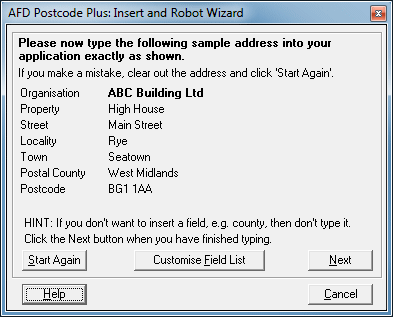
This is the simplest mode to configure AFD Postcode to work with your application. Simply ensure your application is ready to accept the address and then click the 'Show AFD Robot How' button. You will then be prompted to type a sample address into your application and AFD Robot will learn from you to ensure that this is the last time you have to manually type an address into your application.Tell AFD Robot How
This mode will guide you through step-by-step to get your application working, you select your application and tell AFD Postcode the keystrokes needed to move between fields and the fields that you wish to Insert.Advanced Setup
Should you have more advanced requirements, you can fully configure all the settings yourself using the Advanced Setup option - you may well find it easiest to teach or tell AFD Postcode how to insert the address first and then use Advanced Setup to modify the settings if required.When you select this option you will be presented with a fictitious address which you should type into your application exactly as it is shown.
Please note that you should use the keyboard wherever possible to move between fields as this is the most reliable. If you wish to ensure that Robot moves to the first field for you then you should use any shortcut to move to that field before typing the first field. Robot will also record any mouse clicks you use, so if you are unable to use the keyboard to move to a field and your application does not have a scrollable window you can use the mouse if needed. You should click the 'Done' button as soon as you have completed entering the address to ensure that keystrokes unrelated to the address are not picked up. If you do not wish to use a field, e.g. county, then simply don't type it. If you make a mistake, clear out the address in your application and click the 'Start Again' button to start again.
Customising Fields
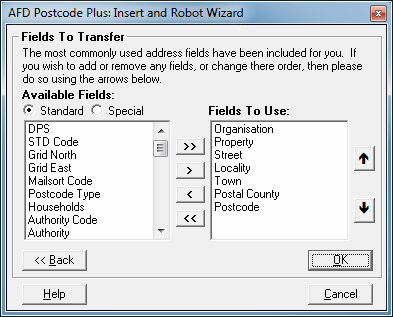
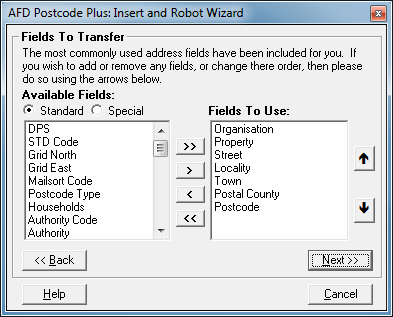
Should you wish to customise the field list, e.g. to add the Mailsort code field, then simply click the 'Customise Field List' button you will then be presented with the following dialog to select the fields to transfer:
You can easily transfer fields to and from the 'Fields To Use' list by using the arrow buttons between the two lists. These are used as follows:
Include all fields Include the selected field(s) (from the 'Available Fields' List) Remove the selected field(s) (from the 'Fields To Use' List) Exclude all fields To change the order that fields are inserted into your application, simply select a field and use the up and down arrows to the right of the 'Fields To Use' fields list to move the selected field up or down the list. Repeat this until you have positioned all fields in the order that you wish them to be inserted. You can also simply type them in a different order when typing the address in your application and Postcode will automatically re-order them for you.
Standard/Special Fields
Under the 'Available Fields' caption there are options to view the Standard or Special fields. This changes the list displayed below. You can mix and match these fields by adding fields from either one to the 'Fields To Use' list. The standard fields are the normal Postcode fields including the current County option. The special fields are more advanced fields including the raw PAF style dependant thoroughfare and thoroughfare fields (this is the street split into two fields if there are two street names in the address), etc., the rest of the county field types, and the outcode and incode portions of the postcode (the part before and after the space respectively). These are useful for applications that store addresses in such formats.Standard Fields take care of the many anomalies and inconsistencies of raw PAF data. We recommend that you use these fields for mapping wherever possible. When using Special Fields map all or none of the fields from Building Number through to Dependant Locality and do not mix and match with the Property, Street and Locality fields from the 'Standard' list. To mix these fields will cause some addresses to be trashed. This is because the standard fields not only concatenate many numbers with the street but also sometimes move the property or concatenate to the locality field as appropriate according to the PAF formatting rules.
Address elements not provided on the Special Fields list are excluded because they are identical to those on the Standard Fields list, e.g. the Town field is never reformatted. If you need to map the building number separately but only have a single property field you can drag both the sub building and building fields to the same field in your database and they will be concatenated together as appropriate.
You should note that the Organisation field in this list is different to that on the Standard fields list. In the standard fields list Organisation appears concatenated with the Department (when present), here the Organisation field is separated out from the Department. Similarly the Street field on the standard list is concatenated with the dependant street (where present), here they are separated.
For example, if your database has standard address fields from Organisation through to Postcode, but has a separate Number field you would make the following mappings:
Database Field Field Type Field Name to Map Organisation Standard Organisation Property Special Sub Building, Building Number Special Building Number Street Special Dependant Thoroughfare, Thoroughfare Locality Special Dbl-Dep. Locality, Dependant Locality Town Standard Town Postcode Standard Postcode You can choose to enter fields such as the dependant thoroughfare and thoroughfare together in one field if desired when you type the sample address by entering them both with a comma seperator.
Completing the Process
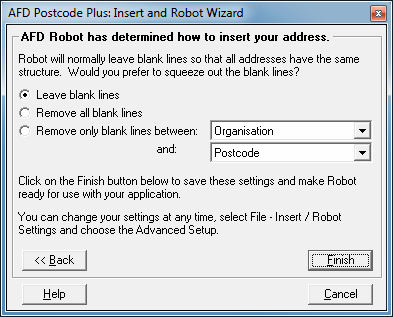
Once you have typed the address and clicked the Done button, you will be presented with the following final options to complete the setup:
Robot needs to know what to do in the case that an address has gaps missing, e.g. an address which does not have a locality present. In most cases you will leave this as the default 'Leave blank lines' setting. However, in some cases you may wish to remove the blank lines, by moving the each address field up to fill the gaps, e.g. with a Word Processor. You might alternatively wish to only remove blank lines between a range of fields such as the Street down to the Town, but you have a fixed Postcode field so you always want that to remain in the same place.
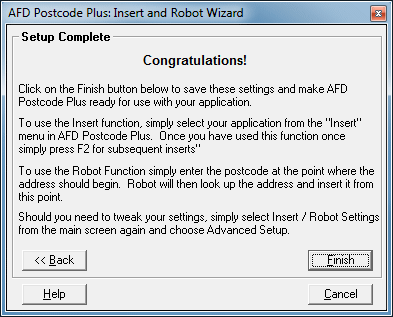
Once you are happy with this you can click the Finish button and your setting will be saved and you can now use Insert and Robot with your application. Simply type a postcode into your application to see it work! If the result isn't as expected you can re-run the Wizard to set it up again.
Once you select to 'Tell AFD Robot How', you can use the Back and Next buttons on each screen to go through the setup process.
The steps of the wizard are as follows:
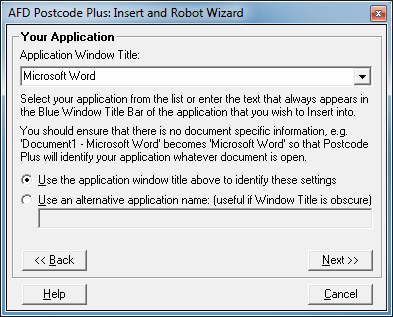
Here you select the window title of your application. This is used by Postcode Plus to identify the application so that both Insert and Robot can use these settings when asked to insert into your application. The window title is the text that appears in the main blue window title bar of your application. This text should always be in the window title, and so should not necessarily be the complete title. For example, you might find Word has a title bar of 'Document 1 - Microsoft Word', however when you save your file it could, for example, change to 'MyDoc.doc - Microsoft Word'. Therefore by setting the Application Window Title to 'Microsoft Word' you will ensure that Postcode Plus can always recognise your application. If your application is running when you run the Wizard you should find your application title is listed in the drop down list box provided. Postcode Plus will attempt to remove known document titles leaving only the application name, however if it has not you should alter the title yourself.
The options provided below allow you to specify a name for your application if desired. Normally you can leave the first option to 'Use the application window title above to identify these settings' as the Application Window Title will be the name of the application. However in some cases the windows title text might be obscure so you might prefer to choose to enter a more friendly application name. This name doesn't affect the Insert or Robot process itself, however it might be useful to specify a name for the application so that you will easily recognise it should you need to manually alter settings with the advanced setup.
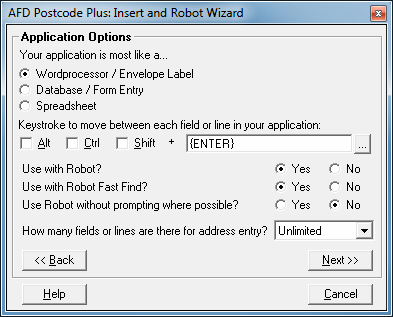
From this screen you can configure a number of different options for your application:
The options given are as follows:
Your application is most like a...
This enables the Wizard to work out the most likely set of options for your application, making the subsequent steps of the wizard easier. You simply take the application type that most closely matches your application. If none of these are that close, then just take the one which seems closest, as you can always customise the setup anyway to match your application. The application categories supplied are as follows:
- Wordprocessor / Envelope Label: This is an application like Microsoft Word or WordPerfect, were the address is entered down the page with each address line (e.g. Street, Locality, Town, etc.) on a new line. Or any application you are using to print a label for an envelope or the address portion of an envelope itself. The address is transferred down the label with each field on a new line.
- Database / Form Entry: This refers to an application like Microsoft Access where fields in a table or form are used to enter the address. Or any application with separate boxes were you would enter each address field. TAB is used to move between the fields..
- Spreadsheet: This is an application like Microsoft Excel or Lotus 1-2-3, were the address is entered in columns for each address field and TAB is used to move between the fields.
Keystrokes to move between each field or line in your application
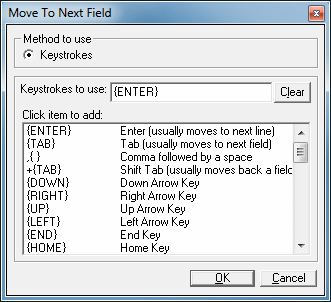
This setting specifies the keystrokes to be used to move between fields in your application. The default will be dependant on the type of application you selected as being most like the one you are setting up now. In most cases this won't need to be changed.To change or enter keystrokes in either text box you can make use of the Postcode Plus powerful keyboard Macro language. Simply click the button labelled '...' to the right of the appropriate text box to be presented with an easy to use dialogue for specifying the keystrokes:
Clicking on any item in the list of possible keystrokes will add the selected item to the keystrokes to use text box. You can also type any normal keyboard key, for example letters, numbers in that box yourself. When you have entered the relevant keystroke's you can press OK to update the text field in the Wizard.
If you need to press a key with the Alt, Ctrl or Shift keys also pressed down you can check the boxes for this in the Wizard dialog, or alternatively you can select the symbols for this from the end of the keystrokes list on the keystrokes dialogue to apply them to the following keystroke.
To specify repeating keys, use the form {key number}. You must put a space between key and number. For example, {LEFT 4} means press the Left Arrow key 4 times; {TAB 3} means press the Tab key 3 times.
If you need more complex settings, such as different keystrokes between different fields, this can be altered from the Advanced Setup once you have completed the Wizard.
Use with Robot
This specifies if your application is going to be used with Robot or not. Regardless of this setting, your settings will work with Insert, which is where you lookup the address in Postcode Plus, select it and then select the application from the Insert menu to insert the address (or press F2 to insert into the last used application again). Robot functionality allows you to type the postcode directly into your application and then insert the full address without having to use Postcode Plus directly first. This option is enabled by default, if you have no need for Robot functionality or if you are entering postcodes in your application and not wanting Robot triggered when you do so then you can opt not to use Robot with your application.Use with Robot Fast Find
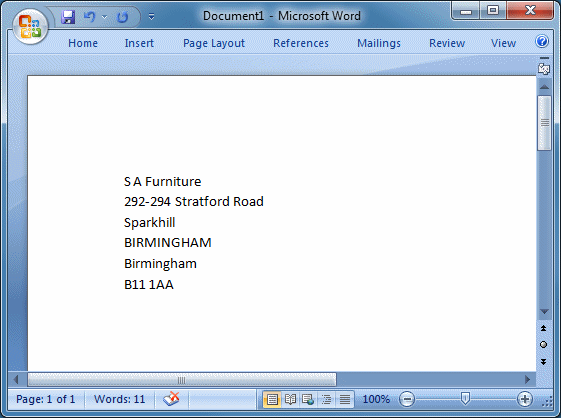
This specifies if your application is going to to be used with Robot Fast Find or not. Robot Fast Find enables you to enter address details to be looked up directly from your application when you do not have the postcode. For example typing #Commercial Street, Birmingham# into your application will give you all the addresses on Commercial Street in Birmingham to choose from. You can then choose the correct one and insert it into your application. You can also lookup a postcode this way, e.g. #B1 1AA#, which could be useful should you need to enter postcodes without looking them up sometimes so the normal robot functionality is not suitable for you. In that case you can say no to 'Use with Robot' but yes to 'Use with Robot Fast Find' - that way Robot would only be triggered when you enter the postcode surrounded by the # symbol.Use without prompting where possible
Normally when you type a Postcode in your application, Robot will prompt you before inserting the address back into your application. However, if you would prefer Robot to do this automatically wherever possible, you can select this option and you will only be prompted if there is more than one possible street address for the postcode you enter.How many fields or lines are there for address entry?
This specifies how many fields (boxes) or lines there are for address entry into your application. If you are inserting into a Wordprocessor, an envelope label, or other free text application you should leave this as unlimited unless the address has to fit into a certain number of fields. If you have enough fields to cover all lines of the address that you will be inserting, then again it can be left as unlimited. Should you have a limited number of lines for address entry, for example because you are inserting into an existing application or database that you can't modify to fit the address, then specifying this will enable Postcode Plus to ensure the address fits in the number of fields that your application has.On this screen you can specify the fields that you wish to be inserted into your application when you use Insert or Robot. The default fields are those from Organisation through to Postcode, the address data provided by Postcode Plus. If you specified less than 7 fields for address entry on the previous screen, the Postal County will not be included as it is not a required address field. You can add and remove any fields you require and if you have specified that you have less fields then you have mapped Postcode Plus will attempt to fit them all in.
Standard/Special Fields
Under the 'Available Fields' caption there are options to view the Standard or Special fields. This changes the list displayed below. You can mix and match these fields by adding fields from either one to the 'Fields To Use' list. The standard fields are the normal Postcode fields including the current County option. The special fields are more advanced fields including the raw PAF style dependant thoroughfare and thoroughfare fields (this is the street split into two fields if there are two street names in the address), etc., the rest of the county field types, and the outcode and incode portions of the postcode (the part before and after the space respectively). These are useful for applications that store addresses in such formats.Standard Fields take care of the many anomalies and inconsistencies of raw PAF data. We recommend that you use these fields for mapping wherever possible. When using Special Fields map all or none of the fields from Building Number through to Dependant Locality and do not mix and match with the Property, Street and Locality fields from the 'Standard' list. To mix these fields will cause some addresses to be trashed. This is because the standard fields not only concatenate many numbers with the street but also sometimes move the property or concatenate to the locality field as appropriate according to the PAF formatting rules.
Address elements not provided on the Special Fields list are excluded because they are identical to those on the Standard Fields list, e.g. the Town field is never reformatted. If you need to map the building number separately but only have a single property field you can drag both the sub building and building fields to the same field in your database and they will be concatenated together as appropriate.
You should note that the Organisation field in this list is different to that on the Standard fields list. In the standard fields list Organisation appears concatenated with the Department (when present), here the Organisation field is separated out from the Department. Similarly the Street field on the standard list is concatenated with the dependant street (where present), here they are separated.
For example, if your database has standard address fields from Organisation through to Postcode, but has a separate Number field you would make the following mappings:
Database Field Field Type Field Name to Map Organisation Standard Organisation Property Special Sub Building, Building Number Special Building Number Street Special Dependant Thoroughfare, Thoroughfare Locality Special Dbl-Dep. Locality, Dependant Locality Town Standard Town Postcode Standard Postcode Transferring fields to/from the 'Fields To Use' List
You can easily transfer fields to and from the 'Fields To Use' list by using the arrow buttons between the two lists. These are used as follows:
Include all fields Include the selected field(s) (from the 'Available Fields' List) Remove the selected field(s) (from the 'Fields To Use' List) Exclude all fields Changing the Order that Fields are Inserted
To change the order that fields are inserted into your application, simply select a field and use the up and down arrows to the right of the 'Fields To Use' fields list to move the selected field up or down the list. Repeat this until you have positioned all fields in the order that you wish them to be inserted.After the fields to transfer stage you will be informed that you have completed the setup of the application and Postcode Plus is ready to store your settings for your application. Clicking on the Finish button will save your settings and you can now start to use Postcode Plus with your application using Insert (select your application from the Insert menu once you have located the address to insert in Postcode Plus), or Robot (type the postcode directly into your application).
Should you wish to review any of your settings before saving them, use the Back button to navigate back through the previous Wizard screens.
If you need to modify the settings for your application, or you find it doesn't quite work as you require it to, then simply select 'Insert / Robot Settings' from the File menu again, but this time select 'Advanced Setup' to modify your settings. Full details of the Advanced Setup is given in the section below.
Insert and Robot Advanced Setup
For speed of setup, it is recommended that the Insert and Robot Wizard is used first to configure an application for use with the Insert and Robot features of Postcode Plus. If you need to change anything with your settings or you have more advanced requirements, either due to how you wish the address to be inserted or because of the way the application is laid out, you can then use the Advanced Setup to modify your settings accordingly and use more advanced features that the Wizard may not include. You can also setup an application for scratch if desired using the Advanced Setup.
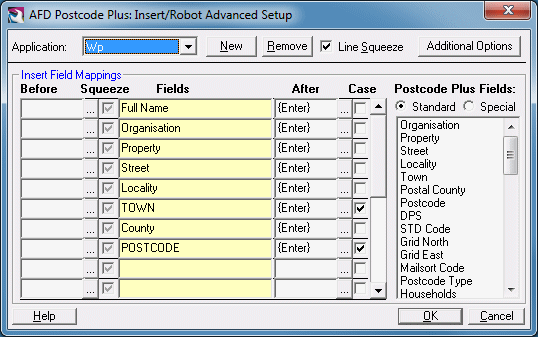
To configure an application to work with Postcode Plus using the Advanced Setup elect the 'Insert / Robot Setup' option from the File menu. Then on the first Wizard screen select the 'Advanced Setup' button. The Advanced Settings screen will then appear:
Selecting your Application
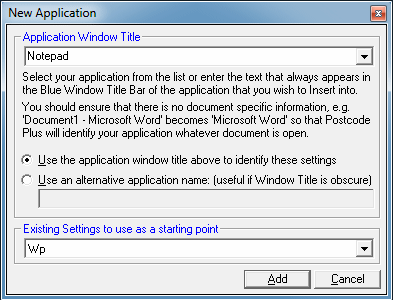
The first thing to do is to select the application settings that you wish to modify. At the top left of this screen the 'Application' drop-down lists all the application settings present. You can use this to select the application you wish to modify. If you wish to add a New application without using the Wizard you can use the 'New' button to do this. The 'Remove' button can be used to delete a setting if required. If you do select the New button the following dialogue will appear:
Here you select the window title of your application. This is used by Postcode Plus to identify the application so that both Insert and Robot can use these settings when asked to insert into your application. The window title is the text that appears in the main blue window title bar of your application. This text should always be in the window title, and so should not necessarily be the complete title. For example, you might find Word has a title bar of 'Document 1 - Microsoft Word', however when you save your file it could, for example, change to 'MyDoc.doc - Microsoft Word'. Therefore by setting the Application Window Title to 'Microsoft Word' you will ensure that Postcode Plus can always recognise your application. If your application is running when you press the New button you should find your application title is listed in the drop down list box provided. Postcode Plus will attempt to remove known document titles leaving only the application name, however if it has not you should alter the title yourself.
The options provided below allow you to specify a name for your application if desired. Normally you can leave the first option to 'Use the application window title above to identify these settings' as the Application Window Title will be the name of the application. However in some cases the windows title text might be obscure so you might prefer to choose to enter a more friendly application name. This name doesn't affect the Insert or Robot process itself, however it might be useful to specify a name for the application so that you will easily recognise it when altering the application settings.
The last item allows you to select existing settings to use as a starting point. You can choose not to use any (select, '(None)', the first item from the drop down list), but it is usually easier to use something as a starting point rather than starting from a blank set of settings. You should therefore use one from the most similar application listed.
Changing Field Mappings
Field Mappings are shown in the light yellow boxes under the heading 'Fields'. You can drag and drop fields from the 'Postcode Plus Fields' list on the right to this list. Items can also be dragged off the list back to the 'Postcode Plus Fields' list if you wish to remove them. Multiple fields can be dragged to a single Field in your application if required.Above the Postcode Plus Field's List you will see there are options to display Standard or Special fields. This option changes the list displayed below. You can mix and match these fields by adding fields from either one to the 'Fields To Use' list. The standard fields are the normal Postcode Plus fields including the current County option. The special fields are more advanced fields including the raw PAF style dependant thoroughfare and thoroughfare fields (this is the street split into two fields if there are two street names in the address), etc., the rest of the county field types, and the outcode and incode portions of the postcode (the part before and after the space respectively). These are useful for applications that store addresses in such formats.
Standard Fields take care of the many anomalies and inconsistencies of raw PAF data. We recommend that you use these fields for mapping wherever possible. When using Special Fields map all or none of the fields from Building Number through to Dependant Locality and do not mix and match with the Property, Street and Locality fields from the 'Standard' list. To mix these fields will cause some addresses to be trashed. This is because the standard fields not only concatenate many numbers with the street but also sometimes move the property or concatenate to the locality field as appropriate according to the PAF formatting rules.
Address elements not provided on the Special Fields list are excluded because they are identical to those on the Standard Fields list, e.g. the Town field is never reformatted. If you need to map the building number separately but only have a single property field you can drag both the sub building and building fields to the same field in your database and they will be concatenated together as appropriate.
You should note that the Organisation field in this list is different to that on the Standard fields list. In the standard fields list Organisation appears concatenated with the Department (when present), here the Organisation field is separated out from the Department. Similarly the Street field on the standard list is concatenated with the dependant street (where present), here they are separated.
For example, if your database has standard address fields from Organisation through to Postcode, but has a separate Number field you would make the following mappings:
Database Field Field Type Field Name to Map Organisation Standard Organisation Property Special Sub Building, Building Number Special Building Number Street Special Dependant Thoroughfare, Thoroughfare Locality Special Dbl-Dep. Locality, Dependant Locality Town Standard Town Postcode Standard Postcode Note: You concatenate fields together, e.g. 'Dependant Thoroughfare' and 'Thoroughfare' together as above by dragging the first field (Dependant Throughfare) and then dragging the next one (Throughfare) to the same field.
Before and After Keystrokes/Mouse Clicks
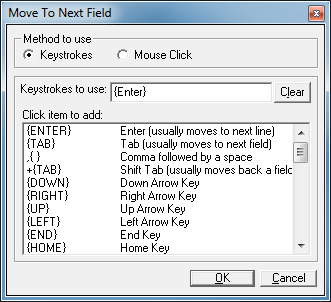
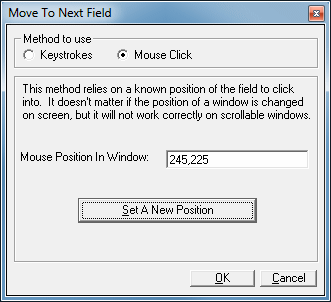
To the left and right of each field respectively, you can specify the keystrokes that are required before and/or after the Field has been entered into the application. If a keyboard shortcut or keystroke is not available to move a particular field, you can also configure AFD Postcode Plus to use a mouse click instead as long as the window is not scrollable - e.g. a website where the position to click might vary. Prior to the first field you may wish to enter any Before keystrokes or a mouse click that is needed to take you to the first field in the application to start inserting from. This is especially useful if the application may not be in the correct field when Insert is used or if the postcode is not going to be entered in the first address field with Robot.The keystrokes are specified using our fully flexible macro language. To easily select keystrokes to use for this, click the '...' button next to the Before or After field you are entering keystrokes for. The following dialog will then be displayed:
Clicking on any item in the list of possible keystrokes will add the selected item to the keystrokes to use text box. You can also type any normal keyboard key, for example letters, numbers in that box yourself. When you have entered the relevant keystroke's you can press OK to update the text field on the Advanced Setup screen.
If you need to press a key with the Alt, Ctrl or Shift keys also pressed down you can select the symbols for this from the end of the keystrokes list on the keystrokes dialogue to apply them to the keystroke following the symbol.
To specify repeating keys, use the form {key number}. You must put a space between key and number. For example, {LEFT 4} means press the Left Arrow key 4 times; {TAB 3} means press the Tab key 3 times.
Should you need to use a mouse click instead, simply select the 'Mouse Click' option:
Specifying Upper Case Fields
For most address fields (but not for data expected always in capital letters - like Postcodes), Postcode Plus will attempt to provide properly capitalised fields.If you prefer for one or more fields to be inserted only in Capital Letters, check the Case check box to the right of the After keystrokes box for the field(s) that you wish to Insert that field in upper case. A Royal Mail approved address prints the Town field in this format - though many typists prefer not to use this format when typing letters.
Line Squeeze
The 'Line Squeeze' option at the top of the dialogue applies to all fields mapped. If this option is enabled, Postcode Plus will not insert any blank lines in the address (i.e. not even the Before or After keystrokes will be used). This is useful for inserting the address for things such as labels where blank lines aren't desirable. For formatted address entry, e.g. into a database, it is better not to use this functionality as address consistency can be more important.Should you wish to squeeze groups of fields, for example you have a fixed Town and Postcode Plus field but you wish to squeeze together the fields above that, then you can check the 'Squeeze' option to the left of the yellow field mappings text field for the consecutive fields that you wish to squeeze together. However many fields are mapped in the space to the right of those in the Squeeze group will be inserted into the number of fields that have Squeeze checked.
Additional Options
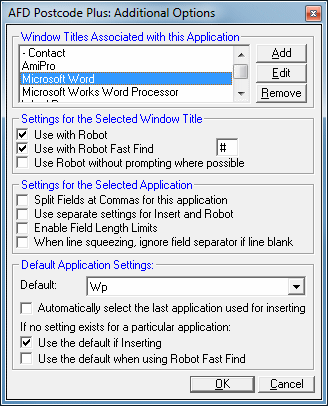
More advanced settings to allow complete flexibility over the way Insert and Robot work which you may require can be found by pressing the 'Additional Options' button at the top right of the Advanced Setup screen. This will present you with the following dialogue:
Window Titles Associated with this Application
Normally only a single window title will be associated with an Application. This is the one you specified when you added the application using the Wizard or the New button on the Advanced Setup screen. In some cases however, such as that shown above which is the WP setting used for multiple word processors, you may wish to have multiple window titles associated with a single application setting. These can be added by using the 'Add' button from this screen. The Edit and Remove buttons also allow you to Edit and Remove window titles as required.Settings for the Selected Window Title
These settings allow you to specify options for each window title associated with this application. Where there is only one window title these are the application settings, however when multiple titles exist such as that shown above, you can specify differing settings for each title if desired. The settings given here are as follows:
Use with Robot
This specifies if your application is going to be used with Robot or not. Regardless of this setting, your settings will work with Insert, which is where you lookup the address in Postcode Plus, select it and then select the application from the Insert menu to insert the address (or press F2 to insert into the last used application again). Robot functionality allows you to type the postcode directly into your application and then insert the full address without having to use Postcode Plus directly first. This option is enabled by default, if you have no need for Robot functionality or if you are entering postcodes in your application and not wanting Robot triggered when you do so then you can opt not to use Robot with your application.Use with Robot Fast Find
This specifies if your application is going to to be used with Robot Fast Find or not. Robot Fast Find enables you to enter address details to be looked up directly from your application when you do not have the postcode. For example typing #Commercial Street, Birmingham# into your application will give you all addresses on that street to choose from. You can then choose the correct one and insert it into your application. You can also lookup a postcode this way, e.g. #B1 1AA#, which could be useful should you need to enter postcodes without looking them up sometimes so the normal robot functionality is not suitable for you. In that case you can say no to 'Use with Robot' but yes to 'Use with Robot Fast Find' - that way Robot would only be triggered when you enter the postcode surrounded by the # symbol. You can also change the # symbol to one more suitable for your application or convenient for you if desired.Use Robot without prompting where possible
Normally when you type a Postcode in your application, Robot will prompt you before inserting the address back into your application. However, if you would prefer Robot to do this automatically wherever possible, you can select this option and you will only be prompted if there is more than one possible street address for the postcode you enter.Settings for the Selected Application
These settings cover the whole application, regardless of if multiple window titles are selected. They are advanced options that you may wish to use to customise the way Postcode Plus inserts data into your application. The settings given here are as follows:
Split Fields at Commas for this application
This option is useful with fields that have been squeezed. It will separate fields which have comma's in them (e.g. a dependant street like 'Newhall Court, George Street') onto two separate lines. You may prefer this for labels or for entry into your application. We don't generally recommend this feature as it means your address will not be in such a consistent format (for example the second street in one address could be in the same place as a locality in another).Use separate settings for Insert and Robot
If enabled this option will separate the settings for Insert and Robot for this application. Normally the settings that Postcode Plus will use for both Insert and Robot are the same for the same application. However if you need to have differing settings for each one you can do this, simply by selecting this option. When you click OK and go back to the Advanced Setup screen you will then see an option at the bottom left of that screen to switch between the settings for Insert and Robot for the application. They will default to being the same but as you make changes to one it will not affect the other.Enable Field Length Limits
This option is designed for applications with small field lengths. It allows you to specify the maximum length of each field you wish to Insert. If the field exceeds this length then Postcode Plus will automatically use the most common abbreviations to try and reduce it's length to minimise truncation of the field. When you enable this option and click OK to go back to the Advanced Setup screen you will see a Length box has been added to specify this length for each field. A value of 0 means the field will be unlimited in length, otherwise you can specify the number of characters that the field can take.Default Application Settings
These settings do not affect the application settings currently being modified, but tell Postcode Plus what to use if no settings has been specified for a particular application that is used, they are also the settings used for determining display options in Postcode Plus itself where needed. You can select the Default settings from the drop-down here. You can also specify if these settings will be used as the default for Inserting, if this is not enabled then Postcode Plus will not Insert into any application that does not have settings specified for it. The setting to use the default when using Robot Fast Find also allows Robot Fast Find to be used with any application by using these default settings.
Postcode Plus can pass information to and from another Windows program through Dynamic Data Exchange - even if the application has no programming or 'macro' language. Before DDE can operate properly, you must tell Postcode Plus about the program you wish to have a DDE 'conversation' with - using the DDE Tab on the Postcode Plus Property window.
To set the DDE Properties, launch the Postcode Plus Properties window from the File menu Properties option (shortcut key [Ctrl]+R).
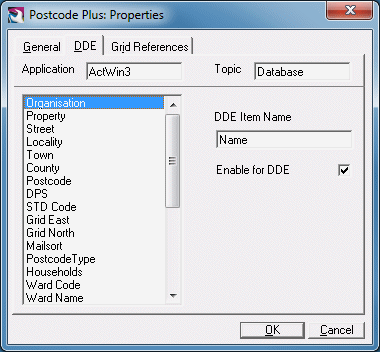
The first two settings - Application and Topic tell Postcode Plus about the program you wish to establish a DDE conversation with - and the information should be provided in the documentation of that program. (When installed, Postcode Plus is set up for use with Symantec's ACT v3 contact manager program).
Postcode Plus offers 24 fields of data available for a DDE conversation - and these are listed in the Fields list box. For each field which you require, select the field, check-mark the 'Enable for DDE' checkbox, and provide the DDE 'Item Name' for that field. The 'Item Name' is the name recognised by your program for the Postcode Plus field - eg the Postcode Plus 'Postcode' field may be known as 'ZipCode' to your program. Your program's documentation should provide the 'Item Name' for you.
Once you have established the DDE settings, you can start a DDE conversation by loading your program, then selecting the View menu Icon for DDE option (shortcut key [Ctrl]+D). This launches a special icon-sized Postcode Plus DDE window, which can be positioned so that it appears to be a tool-bar button on your chosen DDE program. To move the button, click and hold down the RIGHT mouse button, then drag the DDE Icon into position before releasing the mouse button. Postcode Plus will remember this position the next time the DDE Icon is used.
![]()
To read data FROM your chosen program, simply enter the data in the required fields within that program, then click the DDE Icon with the LEFT mouse button. Postcode Plus will examine the data provided by your program and look up the address for you. For more complex searches, consider using 'Cut & Paste' or 'Drag & Drop' to instruct Postcode Plus what you wish to search for.
Once Postcode Plus has listed results of a Lookup or Search (whether the data was 'collected' from your program using DDE or typed directly into Postcode Plus), you can transfer an address back to your program by double-clicking its entry in the Results List. Using this technique along with your program's Insert New Record facility will also allow you to transfer many addresses from Postcode Plus to your program, and so build up a mailing list.
Full access to all the data within Postcode Plus is available to programmers through the Postcode Plus DLLs. This means that for developers - and even for users of programs like Microsoft Access, etc, Address lookup can be entirely automatic and invisible.
Using the DLLs will require programming ability - but AFD supply fully working examples, with free source code, showing how this can be done, in a variety of popular programming languages - like Microsoft Access, Visual Basic, Delphi and C/C++.
For more details, see the section on the Postcode Plus API


