 Graphical User Interface
Graphical User Interface
Graphical User Interface
XSL Formatter V3.4 Windows version has a Graphical User Interface (GUI). By using the GUI, you can easily initiate formatting and then view the formatted results on the browser prior to outputting to PDF or print. You also have control over a number of formatting options, can set the options for PDF output and can direct files to any connected printer.
For developers the GUI provides quick visual feedback of formatting results and has the added ability to save Area and FO Trees to aid in the development processes. In a large multi page document the pages can be browsed as they are formatted. If errors are detected Formatting can be stopped prior to completion, thus on very large runs saving considerable time.
The GUI also lets you save the resulting XSL-FO file from XSLT. This is very useful when you want to transmit a file for formatting, but not the XML or XSL files.
The application window of XSL Formatter V3.4 consists of following elements.
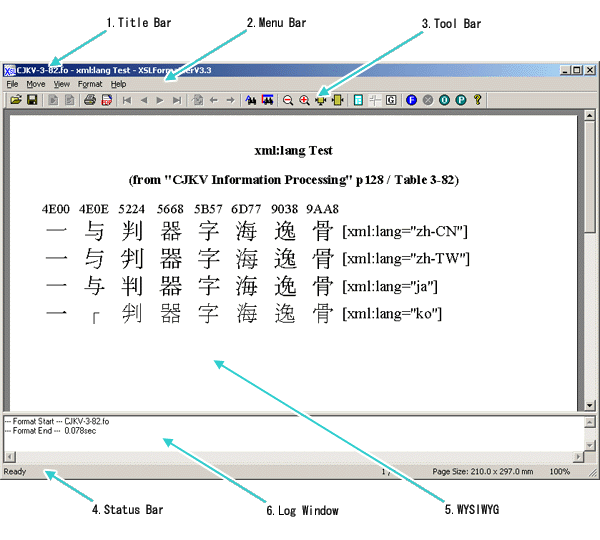
The title bar shows the name of the original file being formatted; the stylesheet (XSL file) if formatting an XML file; and if in the FO file fo:title or if axf:document-info extension property, the content will also be shown (fo:title takes priority).

The most commonly used menu functions are available as buttons on the Tool Bar. You can easily execute these functions by one click of the mouse.
The Status Bar displays the following information.

The WYSIWYG displays the formatted results. The bottom and right scroll bars let you scroll around the displayed page when it displays off the screen in zoom mode. When the scroll bar is displayed, you can use the hand tool as the mouse pointer on the WYSIWYG window to move the page around so that you can view all the areas on it while pressing the left mouse button.
You can format an FO document by dragging and dropping it on the GUI. In addition, it's possible to execute XSLT transformation and formatting of an XML document by first dragging and dropping an XSL stylesheet and then the XML file. Formatting starts immediately after the XML file is dropped on the GUI. If you drag and drop the XML document first the dialog box to "Open Stylesheet" will appear. When you select the appropriate XSL file the formatting will start. See also the Document/Stylesheet Dialog for specifying the stylesheet.
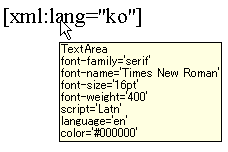
When a mouse is pointed on an area on the screen such as a character string or an image, the information about the area is displayed as a ToolTip. Font name, size, format and size of an image that are actually used can be checked.
The WYSIWYG can also be used to view/preview any graphics supported by XSL Formatter V3.4 by dragging and dropping the Graphics onto the window (see graphics file).
The log window shows a running status as the document is formatted. Minor warnings are shown here. Serious warnings are shown in a popup dialog box. The log window can hold a significant amount of status information. Older information is discarded if the information becomes too much. The final line of information is the time it took to format the document. The log window has its own scroll bar for viewing the information.

The content in the log window can now automatically be saved to a file by click the Others tab in the Other settings dialog and then checking the [Output Log File] check box.
When exiting XSL Formatter V3.4, the position and the size of the GUI are stored. Formatter restarts at that same position and size.
| Menu | Shortcut | Description |
|---|---|---|
 Open...
 |
Ctrl+O | Displays the Document/Stylesheet Dialog. |
 Save AreaTree...
 |
Ctrl+A | Displays the Save AreaTree Dialog. no-LT |
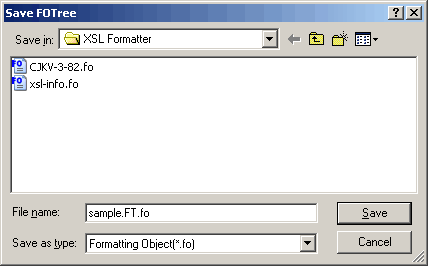
| Displays the Save FOTree Dialog. | ||
| Displays the Save FO Dialog. | ||
 Edit Document
 |
Edits the target XML document or stylesheet using the editor specified in the external editor page in the Other Settings Dialog. | |
 Edit StyleSheet
 |
||
 Print...
 |
Ctrl+P | Displays the Print Dialog. |
 PDF Output
 |
Ctrl+D | Displays the PDF Output Dialog. |
| Displays the SVG Output Dialog. | ||
| Display the Document Information Dialog. V3.4 | ||
| Displays the Import Option Setting Dialog. | ||
| Displays the Export Option Setting Dialog. | ||
| Displays the files that are recently formatted. | ||
| Alt+F4 | Exits XSL Formatter V3.4. |
| Menu | Shortcut | Description |
|---|---|---|
 First Page
 |
Ctrl+Home | Goes to the first page. |
 Previous Page
 |
Ctrl+PageUp | Goes to the previous page. |
 Next Page
 |
Ctrl+PageDown | Goes to the next pate. |
 Last Page
 |
Ctrl+End | Goes to the last page. When you stop formatting before finishing, the last formatted page will be displayed. |
 Go To Page...
 |
Ctrl+G | Displays the Go To Page Dialog. This only functions in multi page documents. The current page position is shown in the Status Bar. |
 Back
Back |
Alt+Left | As you move through the pages of a document Formatter stores up to 10 moves. By using the Back and Forward you can step backwards or forwards through the pages viewed. If you format again, Formatter will display the first page of the document. Back will take you to the last displayed page prior to formatting. |
 Forward
 |
Alt+Right | |
 Search String...
 |
Ctrl+F | Displays the Search String Dialog. |
 Search Property...
 |
Shift+Ctrl+F | Display the Search Property Dialog. |
| Shift+F3 | Searches previous from the position just before the search position. | |
| F3 | Searches next from the position just before the search position. | |
| Ctrl+L | Displays the Page Limit Dialog. |
| Menu | Shortcut | Description |
|---|---|---|
 Fit in Window
 |
Ctrl+V | Zooms the displayed size of the formatted page to automatically fit the entire page in the window. |
 Fit Page Width
 |
Ctrl+W | Automatically zooms the width of the formatted page to the width of the window. |
 Zoom In
 |
Ctrl+1 | Changes the zoom ratio as follows.
|
 Zoom Out
 |
Ctrl+2 | |
| Ctrl+0 | Displays the Zoom Dialog. | |
 Show Border
 |
Ctrl+B | Used to confirm how the formatted result is divided in areas. The border does not affect PDF Output or Print. |
| Displays the Color Dialog. Possible to specify the border color. | ||
 Show Printer Mark
 |
Effective when formatting the document that includes printer marks. Specifies whether to display printer marks or not. | |
 Display Glyph
 |
Available to see if the character is displayed with the font actually specified. In Windows, a font sometimes may be replaced, and such a character is not outputted correctly in the PDF. | |
| Specifies whether to show or hide the Tool Bar. | ||
| Specifies whether to show or hide the Status Bar. | ||
| Specifies whether to show or hide the Log Window. The log window is automatically displayed when execute formatting. |
| Menu | Shortcut | Description |
|---|---|---|
 Format
 |
F5 | Formats the current document (FO or XML+XSL). |
 Stop Format
 |
ESC | Stops formatting. In a large multi page document the pages can be browsed as they are formatted. If errors are detected Formatting can be stopped prior to completion. |
 Format Option Setting...
 |
Shift+Ctrl+O | Displays the Format Option Setting Dialog. |
 PDF Option Setting...
 |
Shift+Ctrl+P | Displays the PDF Option Setting Dialog. |
| Display the Other Settings Dialog. |
| Menu | Shortcut | Description |
|---|---|---|
 Online Manual
 |
F1 | Displays this Online Manual. |
| Displays the Q&A on the Internet. | ||
| Sends mail to Antenna House Support. The necessary information such as serial number, etc., is embedded automatically. It's not available with the evaluation version and XSL Formatter V3.4 Lite. | ||
| Displays the Antenna House website on the Internet. | ||
| Shift+F1 | Displays the About Dialog of XSL Formatter V3.4. |
The following popup menu/boxes are displayed in the GUI.
| Menu | Description |
|---|---|
| Format | Used to select the FO or XML+XSL file(s) for formatting. |
| Stop Format | Displays when formatting fails. Contains a brief explanation of why the document could not be formatted. |
The content in the Log Window depends on what function Formatter is performing.
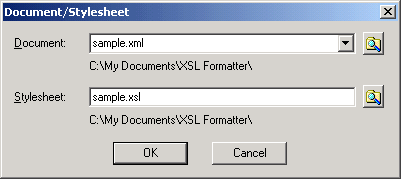
Used to specify the target FO or XML and XSL. The FO or XML document is specified in the Document combo box. If an XML document has been selected then the XSL stylesheet or the Project file needs to be specified in the Stylesheet box. The Project file is a file used in Antenna House XSL Report Designer. FO files can only be specified in the document box. Specified files can reside on the local file system, the network or over the internet. Files over the internet can be specified with a URL via HTTP.
Local files can also be specified by a URL format starting with file://. Under the each edit box, the directory or the base URL is displayed, which indicate the base directory when the relative path is specified.
Recent used files are listed in the Document drop-down list. Only the XML documents are listed even though the stylesheets are also specified in pairs. However the target stylesheet can be inserted in the Stylesheet combo box automatically when the document is selected.
Click [OK] to start formatting.
In XSL Formatter V3.4 it is not necessary for an FO file to have a ".fo" extension. Formatter determines the file type based on its content. If from within an XML document a stylesheet is called, then it is not necessary to separately specify a stylesheet. The specified stylesheet is automatically adopted.
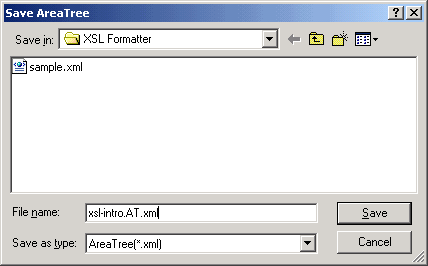
The AreaTree is an XML representation of the formatted document that includes all the page geometry and layout information. Since all formatting information and all information necessary for formatting is included in the area tree it is a very useful tool for stylesheet developers. Press the [Save] button to save the area tree. An area tree XML file can be opened using the current browser, e.g. MSIE. It's possible to format an area tree by specifying it in the document combo box of the Document/Stylesheet Dialog. Caution: Area trees can be very large. Under normal circumstances they should not be modified as the reformatted results cannot be guaranteed.
It's not available to save and load the area tree with XSL Formatter V3.4 Lite.
In processing an FO or XML and XSL file Formatter first complete the FO file by adding properties, adding the elements omitted in the loaded FO or the resulting FO of the XSLT transformation and removing unused elements. The area tree is generated by evaluating this completed FO. Press the [Save] button to save the FO that was made at this time. If you format a document from the area tree, this menu cannot be selected.
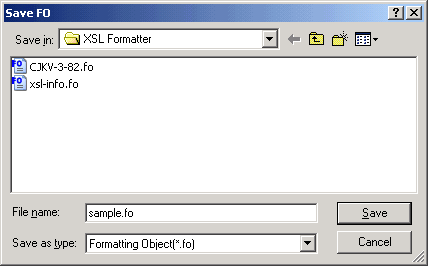
This menu item lets you save an FO file that is the result of the XSLT transformation of the XML and XSL files that is being formatted. This menu is only available for files formatted from XML and XSL files.
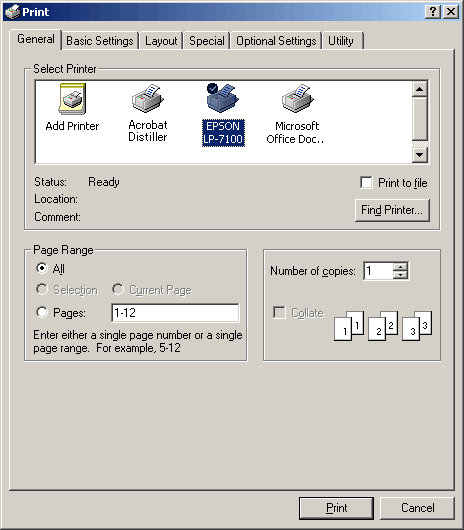
The print Dialog lets you output the formatted result to any printer installed or accessible from your Windows system. The user can select to print all pages, a range of pages, or selected pages. If formatting is not completed in the GUI Formatter reformats the document from the beginning for output to the printer. For this reason it may take more time to output to a printer than the GUI. The border used to confirm how the formatted result is divided in areas does not affect Print Output.
See also Restrictions regarding print.
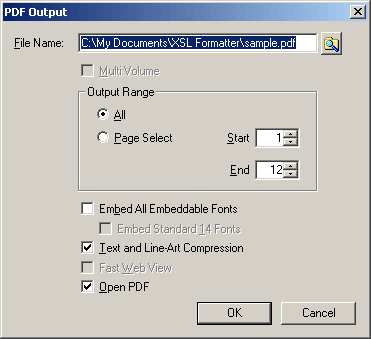
The PDF Output Menu enables outputting the formatted results to PDF by using the PDF output engine developed by Antenna House. Through the menu a user can select to output the entire document or selected range of pages. If formatting is not completed in the GUI then Formatter reformats the document from the beginning for output to PDF. For this reason it may take more time to output to a PDF file than the GUI. The border used to confirm how the formatted result is divided in areas does not affect PDF Output.
When FO includes the axf:output-volume-info extension property which enables to output volume separately, it's effective to check. By checking here, the output volume can be separated.
Specifies the number of volumes when outputting in multi separate volume, and specifies the number of pages for others. If the specified value in [End(E)] is O or larger than the actual number of volumes or pages, the output range continues to the end.
Embedding fonts in a PDF makes it possible to create a PDF that can be browsed anywhere and independent of the fonts available on the local machine. This is particularly important when generating multilingual PDF files. The negative is that is can substantially increase the size of the PDF file.
Usually, Standard 14 Fonts are not embedded even if the [Embed All Embeddable Fonts] check box is checked, However, by checking the [Embed Standard 14 Fonts] check box, Standard 14 Fonts can be embedded.
Selecting this option makes the PDF file more compact by compressing the text and line-art.
Generates Linearized PDF. In PDF's character, it cannot be optimized unless once usual PDF is generated. Therefore, although the generation of the Linearized PDF requires time rather than usual, the display of the generated PDF on the Web will be in high-speed.
Opens the created PDF using the application associated with extension .pdf (in many cases, it is Adobe Acrobat or Reader).
Changes made in this dialog are temporary and do not affect the much more comprehensive PDF Option Settings File under the Format Menu. Please specify the detailed settings regarding PDF output in the PDF Option Setting Dialog.
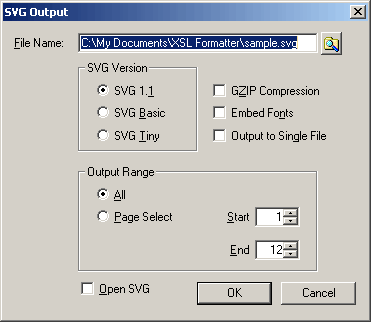
The SVG Output Menu enables outputting the formatted results to SVG by using the SVG output engine developed by Antenna House. Through the menu a user can select to output the entire document or selected range of pages. If formatting is not completed in the GUI then Formatter reformats the document from the beginning for output to SVG. For this reason it may take more time to output to a SVG file than the GUI. The border used to confirm how the formatted result is divided in areas does not affect SVG Output.
Specifies the type of SVG to output.
Specifies the range to output. This feature is not available with the evaluation version.
Outputs GZIP compressed svgz. The extension is set to .svgz.
Embeds fonts in SVG. This feature is not available with the evaluation version.
Specifies whether pages are outputted as one SVG file, or each page is outputted as an individual file when outputting two or more pages. When outputting two or more SVG, page numbers are placed before the extension of the output file name. For example, if the specified file name is document.svg, page numbers are put as document1.svg, document2.svg,... The number format can be set in Option Setting File, etc.
Opens the created SVG using the application associated with extension .svg.
Changes in this dialog are temporary and are not reflected to the Option Setting File. See also SVG Option in the Other Settings Dialog.
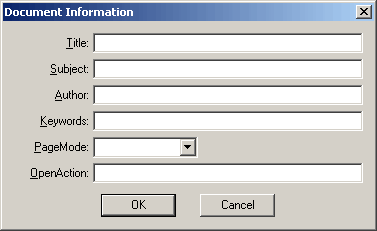
The information of axf:document-info in FO is displayed. The content can be changed here, and it can be reflected to the output PDF. The content of the change is not reflected in former FO. Refer to axf:document-info for details. V3.4
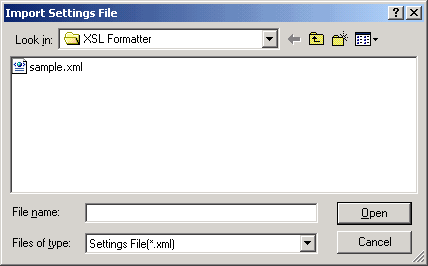
This enables you to load an Options Setting File with previously saved preferences from the Option Setting Dialog. By default if the XfoSettings.xml file exists in the same directory where XSLFormatter.exe is installed the XfoSettings.xml is automatically loaded at startup as the options setting file.
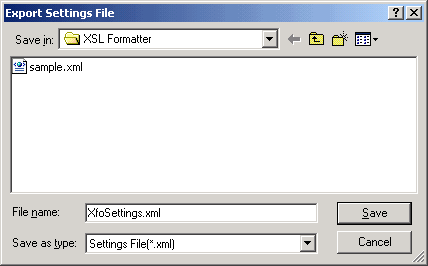
Writes the current setting to the Option Setting File. Most of the setting contents can be referred to in the Option Setting Dialog.
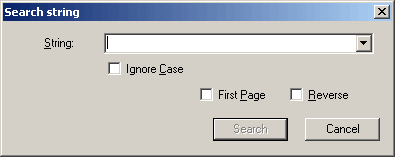
Specify a sequence of characters to search. This dialog continues being displayed until it closes. When some characters have found in the last searching, It start searching from the following character. For example, when ABCDE is searched and is found, the next searching starts from B. When having found nothing, the searching begins from the first or the last page. In order to cancel the highlight of a searching result, please click anywhere on the GUI screen.
Searches a sequence of characters without distinguishing upper-case and lower-case. It is applied to all Latin alphabets, Cyrillic alphabets, etc. that have upper and lower case characters.
When these check boxes are checked, It starts searching from the first or the last page. When the Reverse check box is unchecked, the display of the check box on the left side changes to [First Page]. When the Reverse check box is checked, the display of the check box on the left side changes to [Last Page].
When the [Reverse] check box is checked, it starts searching toword the first page.
This search function has the following limitations.
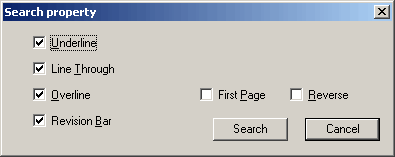
Specify a property to search. This dialog continues being displayed until it closes.
Specify a property to search.
When these check boxes are checked, It starts searching from the first or the last page. When the Reverse check box is unchecked, the display of the check box on the left side changes to [First Page]. When the Reverse check box is checked, the display of the check box on the left side changes to [Last Page].
When the [Reverse] check box is checked, it starts searching toword the first page.
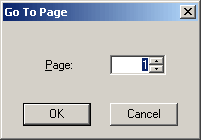
Used to specify the page number to go to and can be from 1 to the total number of formatted pages displayed in the Status Bar.
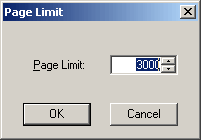
This is used to control the maximum number of formatted pages for a very large document that a user wants to make available for display in the GUI. A large amount of memory is necessary to display a large number of pages. By specifying an appropriate value it is possible to improve the efficient working of the system. See also Restrictions for more detail.
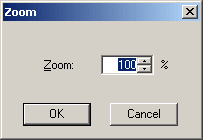
Specifies the zoom ratio. Can be set from 5% to 1000%.
By default if the XfoSettings.xml file exists in the same directory where XSLFormatter.exe is installed the XfoSettings.xml is automatically loaded at startup as the Options Setting File. If you want to load the other setting file, click Import Setting Files on the File menu.
Through the Format Option Setting Dialog, formatting items in the Option Setting File can be modified. Once changes are made through the Format Option Setting Dialog, click [OK] to write the changed items to the XfoSettings.xml file that exists in the same directory where the XSLFormatter.exe is installed. Next time XSL Formatter V3.4 is started the saved settings will be used.
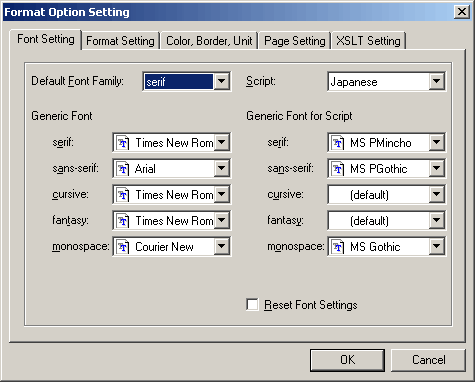
Specifies the generic font family to use automatically when there is no setting of the font family in the FO file. If a generic font family is specified in the FO, this setting is ignored. The following five generic font families can be defined:
Please refer to the following [Generic Font] for more detail.
Maps actual fonts to each generic font family. Generic font families specified in the FO replace those specified here. These settings are adopted for those generic font families not specified in the FO.
<fo:block font-family="serif">
Generic font families are symbolic names defined in W3C CSS2 Specification. XSL Specification derives the generic font family from the CSS2 Specification.
Serif font families are fonts which have a slight projection at the end of a letters/glyphs such as Mincho (Japanese) and Times New Roman. Sans-serif font families have plain stroke endings for their letters/glyphs and corresponds to fonts such as Gothic (Japanese), Helvetica and Arial. Cursives are font families that have connected strokes and Italic typefaces for its glyphs such as Soushotai (Japanese). Fantasy fonts are primarily decorative. Monospace is a font family that its font pitch is fixed, such as Courier.
The Script setting lets you set the generic font families to be used for 10 different writing systems. This includes Japanese, Chinese Simplified, Chinese Traditional, Korean, Latin, Cyrillic, Greek, Arabic, Hebrew and Thai. Each of the 10 writing systems can have its own set of generic font families defined.
Fonts specified in the FO supersede the Generic font settings. When fonts are not defined in the FO then these settings are adopted.
The following examples illustrate which fonts would be used if serif was specified as the generic Font, the font-family and script properties are not specified in FO, and the script for the text is unclear.
The font specified in the serif combo box in Generic Font is used for the TEXT.
The font specified in the sans-serif combo box in Generic Font is used for the TEXT.
The font specified in the serif combo box in Generic Font for Serif for Japanese is used. If it is not specified, the font specified in the serif combo box in Generic Font is then used.
The font specified in the sans-serif combo box in Generic Font for sans-serif for Japanese is used. If it is not specified, the font specified in the sans-serif combo box in Generic Font is then used.
See also Extensions for the script property.
Check Reset Font Settings to reset all font settings to the default. Press [OK] to execute the setting.
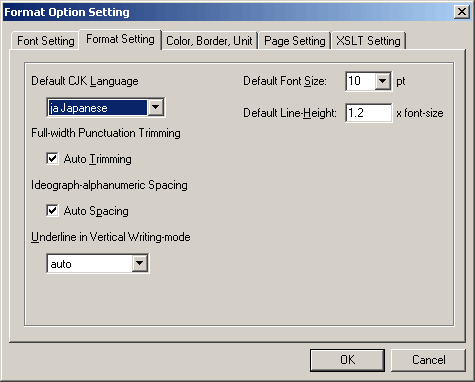
When the script is not explicitly specified, there may be cases where it is hard to distinguish CJK (Chinese/ Japanese/Korean) in Kanji. In such cases, the setting here is adopted. Select the appropriate CJK language from the followings.
Specifies whether to trim the full-width punctuation in Japanese. This setting affects the value of the extension properties, axf:punctuation-trim="auto" and axf:kerning-mode="auto".
Specifies whether to add space between Japanese text and Western text. This setting affects the value of the extension properties axf:text-autospace="auto".
Specifies whether to place the underline on the right side of the text or on the left side of the text in vertical writing-mode. When 'auto' is specified, if the language in the language property is Japanese(ja) or Korean(ko), the underline is placed on the right side. If there is no language property specified, it depends on the standard CJK language setting. This setting affects the value of the extension property axf:vertical-underline-side="auto".
This setting is used to specify the font size when the font size is not specified in the FO. The value must be specified in point.
This setting is used to specify the line-height to be used when specified as a property in the FO. The value must be specified as a ratio against the font size in ems.
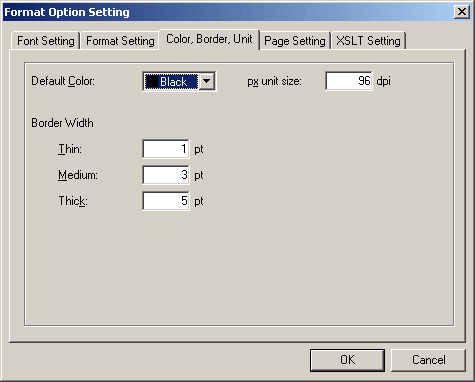
Specifies the foreground color to be used when the color property is not specified in the FO. The following values can be used:
| Black | color="#000000" | |
| Blue | color="#0000FF" | |
| Aqua | color="#00FFFF" | |
| Lime | color="#00FF00" | |
| Fuchsia | color="#FF00FF" | |
| Red | color="#FF0000" | |
| Yellow | color="#FFFF00" | |
| White | color="#FFFFFF" | |
| Navy | color="#000080" | |
| Teal | color="#008080" | |
| Green | color="#008000" | |
| Purple | color="#800080" | |
| Maroon | color="#800000" | |
| Olive | color="#808000" | |
| Gray | color="#808080" | |
| Silver | color="#C0C0C0" |
Specifies the actual border width of the three symbolic values; thin, medium and thick that can be written in FO. The value must be specified in pts (points).
<fo:block border-width="thin">
Specifies the conversion factor for px (pixel) units written in FO as a point number per inch. This value is actually used when the formatted results are outputted to a browser or PDF. In XSL, you can specify 'pixel' as a unit of measurement. Pxpi specifies the coefficient, which converts the value of the specified pixel, as "the number of pixels per inch" when formatting. It's specified with the real-type numeric value. The initial value is 96.
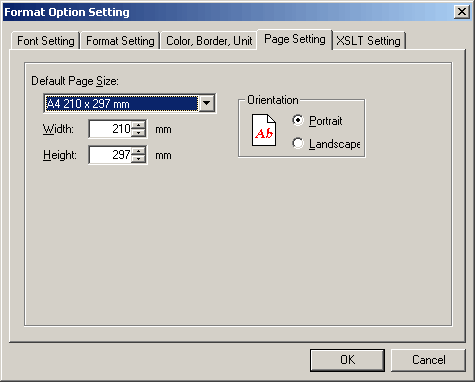
Specifies the page size to be used when the page-width and page-height properties are not specified in the FO. The page size selected from the combo boxes reflects the [Width] and [Height]. The page size can be changed arbitrarily. If you change the orientation of the page in the [Orientation] in this dialog, the value of the [Width] and [Height] are swapped.

Specifies the settings regarding XSLT processors. See also XSLT Settings for more details.
Check [Use MSXML] to use MSXML3 or MSXML4 as an XSLT processor.
Check [Use External XSLT processor] to use an external XSLT processor. You have to specify the command-line format of a XSLT processor to use to [Command] and specify the Parameter format of xsl:param to [%param]. It is considered that MSXML is used when the command-line is not specified.
Specifies the parameter name and the parameter value of xsl;param given to an XSLT processor. Press [Add...] to add parameters, press [Delete] to delete the selected parameter.
Below shows examples of setting for some major XSLT processors.
| command: | msxsl %1 %2 -o %3 %param |
| %param: | %p=%v |
| command: | java -cp xalan.jar org.apache.xalan.xslt.Process -IN %1 -XSL %2 -OUT %3 %param |
| %param: | -PARAM %p %v |
| command: | java -cp saxon.jar com.icl.saxon.StyleSheet -o %3 %1 %2 %param |
| %param: | %p=%v |
| command: | xsltproc --output %3 %param %2 %1 |
| %param: | --param %p %v |
| CAUTION: | The example shown here may be inaccurate. Please refer to each site and document. |
|---|
PDF Option Settings are stored in the XfoSettings.xml as part of the Option Setting File which is loaded at Formatter starting-up.
Changes to the PDF Option Setting Dialog can be saved to the Option Setting File by selection [OK] after changes are made. This writes the changes to the XfoSettings.xml that exists in the same directory where the XSLFormatter.exe is installed.
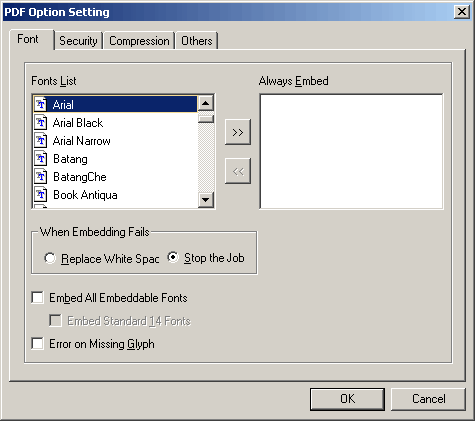
Select the target fonts you want to embed in PDF from the [Fonts List]. Press the [>>] button to move the selected font to [Always Embed]. If you want to delete the font from Always Embed. Press the [<<] button.
Gray-colored fonts are not available to embed. Also there may be a case that a font that cannot be embedded is included in the Font list if you edited the font originally in the Option Setting File. Despite being in the list the font cannot be embedded
This option lets you select what you want the system to do if embedding of a font fails.
Select either:
[Replace White Space] to continue embedding font. The font is replaced with white space and will be embedded.
[Stop the Job] to stop embedding. An error will be reported and the PDF generation will be stopped.
Check [Embed All Embeddable Fonts] to embed all embeddable fonts in PDF. If this option is checked the fonts in the [Font List] and [Always Embed] are displayed in gray color.
Usually, Standard 14 Fonts are not embedded even if the [Embed All Embeddable Fonts] check box is checked, However, by checking the [Embed Standard 14 Fonts] check box, Standard 14 Fonts can be embedded.
When the corresponding glyph for certain character to be displayed does not exist in the specified font, specifies whether to break off the processing as an error. Even if PDF is generated without checking this item, the character will be displayed as a white space or a small box in PDF for missing glyph. Also the glyph might actually not be exist in the specified font even when being able to be displayed on the screen of GUI.
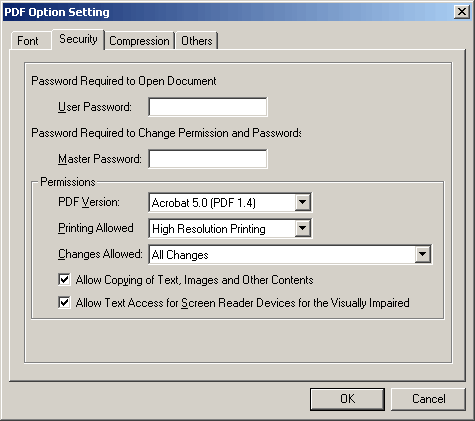
Specifies the password to open the PDF document. The modified contents here will not be written in the Option Setting File.
Specifies the password to change the access privilege and the password of the PDF. The modified contents here will not be written in the Option Setting File.
Select the PDF version to generate from the followings.
Specifies whether to allow printing the PDF file or not. Select the operation form the followings in PDF 1.3.
Select the operation form the followings in PDF 1.4 or later.
Specifies whether to allow changing the PDF document or not. Select the operation form the followings in PDF 1.3.
Select the operation form the followings in PDF 1.4 or later.
Specifies whether to allow copying of text, images and other contents in the PDF file to the clipboard or not.
Specifies whether to allow text access for screen reader devices in the PDF file or not. This setting is effective with PDF 1.4 or later.
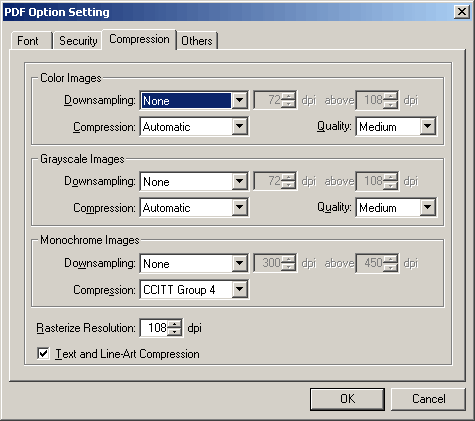
Specifies the compression method of a raster image for each color images, grayscale images and monochrome images.
Selects the method of a down sampling from the following.
Specifies a image of more than what dpi is down sampled to what dpi, except None.
Selects the compression method from the following for color images and grayscale images.
Select Automatic to operate both JPEG compression and ZLIB compression, and adopt the one that produces the smaller size. JPEG2000 compression is not taken into consideration. JPEG2000 is effective only for PDF1.5 or later.
Selects the compression method from the following for monochrome images.
Selects the resolution from the following for color images and grayscale images.
Some vector images are converted into a raster image, and are stored in PDF. The resolution of the raster image created by the conversion is specified with the value of 70 to 500dpi. SVG, EMF, and WMF are drawn in PDF, without being converted into a raster image. MathML is drawn in PDF, without being converted into a raster image only when XSL Formatter MathML Option is utilized.
Specifies whether to compress the text and the line art in the PDF to make the PDF size smaller or not.
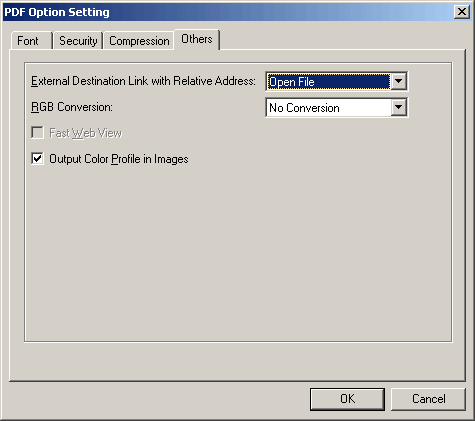
Specifies the way to transform the external destination links with relative addresses to the PDF link property. Select from one of the following:
Specifies how to convert the RGB color space to DeviceGray.
Does no conversion. DeviceRGB is outputted.
Converts Black to DeviceGray, converts the others to DeviceRGB before outputting.
Converts Gray color (mono tone) to DeviceGray, converts the others to DeviceRGB before outputting.
Converts the all color spaces to DeviceGray before outputting. This conversion is based on the following formula: gray = 0.3×red + 0.59×green + 0.11×blue (0.0 ≤ red,green,blue ≤ 1.0).
As for the images other than SVG, MathML, EMF or WMF, which are drawn using their own drawing engine, there is no conversion.
Generates Linearized PDF. Linearized PDF enables PDF files to be viewed much faster over the Web by enabling viewing of the PDF as soon as the first page is downloaded rather than requiring that the entire PDF file be downloaded before it can be viewed. To linearize a PDF file is a two step process: First, a standard PDF file is produced. Second, the standard PDF file is linearized. generated first and then that file is linearized.
Specifies whether to output a color profile of images contained in an original image also to PDF.
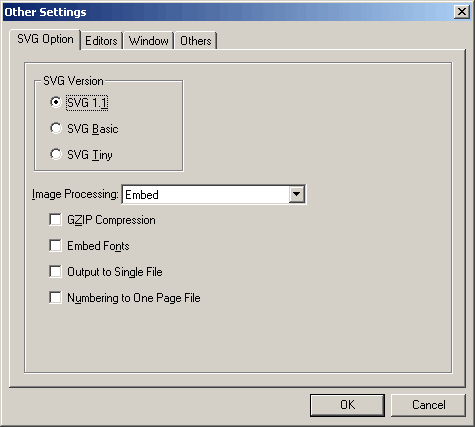
In SVG Option in the Other Setting Dialong, the item concerning SVG set in the Option Setting File is adjusted. The contents changed here are written out to XfoSettings.xml which exists in the same place as XSLFormatter.exe by clicking the [OK] button. Therefore, it is reflected next time of the starting.
Specifies the version of SVG to output.
Specifies whether to embed or link images to SVG.
Please refer to Image Output in SVG Output for details.
Outputs GZIP compressed svgz. The extension is set to .svgz.
Embeds fonts in SVG. Certain fonts might not be able to be embedded correctly.
Specifies whether pages are outputted as one SVG file, or each page is outputted as an individual file when outputting two or more pages. When outputting two or more SVG, page numbers are placed before the extension of the output file name. For example, if the specified file name is document.svg, page numbers are put as document1.svg, document2.svg,... The number format can be set in Option Setting File, etc.
When Output to Single File is not specified, specifies whether the number is placed to the output file name even if SVG has only one page.

Edits the target XML document or stylesheet using the editor specified here. This setting can be used from [Edit Document] on the File menu or [Edit StyleSheet] on the File menu.
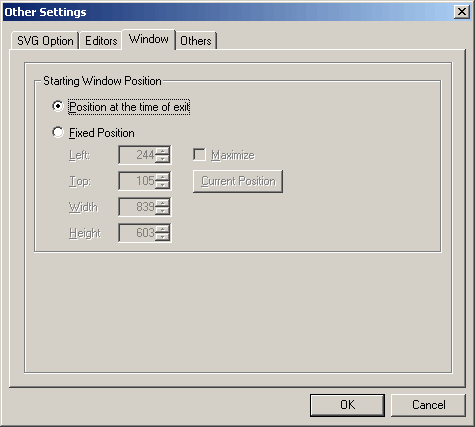
Specifies the position of Window in GUI when starting up. Select the [Fixed Position], click the [Current Position] button to input the current information.
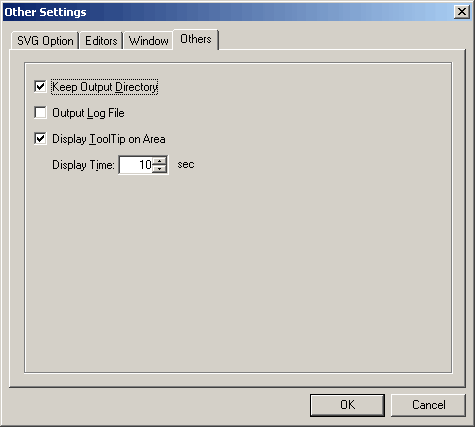
Specifies whether to remember the previous position of the directory used as the standard of a file name in the PDF Output Dialog, etc. If it's not checked, the same directory as the formatted document is assumed.
The information shown in the log window is saved as XSLFormatter.log in the same place where XSLFormatter.exe is installed. The information in this file will be deleted when XSLFormatter.exe is invoked.
Specifies whether to display the information about the area as a ToolTip when a mouse is pointed on an area on the screen such as a character string or an image. A ToolTip automatically disappears by moving a mouse or reaching the specified display time.
Displays the version of XSL Formatter V3.4 and the license information. If you are using an evaluation license the evaluation period remaining can be confirmed here.
The GUI program XSLFormatter.exe can be invoked with parameters.
| Parameter | Functions |
|---|---|
| -s | If XSL Formatter V3.4 has already been invoked, The formatting will be executed with the already running XSL Formatter V3.4. If this parameter is not specified, another XSL Formatter V3.4 will run. |
| -d XML-Document | Specifies the URI of the target XML document. |
| -t XSL-Stylesheet | Specifies the URI of the XSL stylesheet which is used for formatting. Invalid if one of the -d, -p, -pt parameters is not specified. |
| -p XML-Document | Prints the XML document by displaying the Print Dialog, without displaying the GUI screen. The -s parameter is invalid. |
| -pt XML-Document Printer-Name | Prints the XML document neither displaying the GUI screen nor displaying the Print Dialog. If Printer-Name is omitted, the standard printer is used. The -s parameter is invalid. |
| -pts XML-Document Printer-Name | Same as the -pt parameter, but prints the XML document neither displaying the stop dialog box under printing. If Printer-Name is omitted, the standard printer is used. The -s parameter is invalid. |
| -ps Printer-Setting-File | Specify the path name of the Printer Setting file. Please refer to "How to create a Printer Setting file". |
| -c Copies | Specifies the number of copies when printing and effective only when the -pt or -pts parameter is specified. If it's omitted, the value is counted as 1. |
| -param name=value | Specifies the parameter name and the value of xsl:param. If the value contains a white space, please specify "name=value". -param can be specified multiply. |
The GUI has certain formatting restrictions that do not apply when using the other interfaces.
The maximum number of pages that can be formatted is controlled by the [Page Limit] setting on the Move menu. This is because storing formatted pages for browsing in the GUI consumes memory. For very large documents the system would run out of memory without this restriction.
When using one of the other interfaces it's possible to format a very large number of pages because the information of already formatted pages is aggressively discarded while formatting.
In the GUI all pages can be outputted to PDF or the printer regardless of this limitation.
Windows functions are used for EMF and WMF drawing on the GUI. For this reason there may be a case that the formatted results in GUI and the formatted results in the PDF may be different. The same applies to the printing of EMF and WMF using Windows printer drivers from GUI or the Command-line Interface.
There may be a case that the SVG drawing in GUI and in the PDF may be different.
There may be a case that fonts displayed in an image are dropped when outputting to PDF. This is because Windows might substitute the fonts. It is necessary to specify the proper font-family in the FO in order to avoid this.
Sometimes the GUI may not properly display the entire ascenders and descenders portions of Arabic and Thai characters. The PDF output should still be correct.