


Overview
Dundas Chart for SharePoint™ provides you with an exceptional Data Connection Wizard that lets you connect your chart web part to a variety of data sources including other web parts, Site Lists, an External Database or Spreadsheet, a Business Data Catalogue, or to an Excel Services data source. This article has been written with the goal in mind of explaining how to use this data wizard. The Data Connection Wizard is a dynamic component that automatically changes and adapts the contents of its screens in order to accommodate various data sources that are available to be chosen by its user.
Rather than trying to explain how to connect to each data source available from within a single all encompassing article, we have chosen instead to separate out the processes and wizard's screens, and document them for you by data source. The modest goal of this particular article is to discuss how to access the Data Connection Wizard, and perform the tasks necessary to complete the first step in the wizard's multi-step data connection process.
The first step in the data connection wizard is to choose a data source, and you will find that, regardless of the data source chosen, everything up to the conclusion of step 1 is exactly the same for all data sources, and so this article will help us to avoid any unnecessary repetition of material by explaining the first step here.
Using Data Sources
The Data Connection Wizard, shown in Figure 1 below, lets you connect your charting web part to any one of the data sources shown. The first step in the Data Connection Wizard is to choose one of the data source types listed.
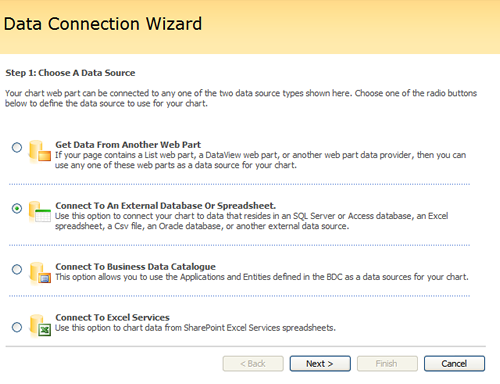
Figure 1: You can use any of the data sources shown to supply data to your chart web part.
Once you have chosen a suitable data source for your chart, you can begin the process of connecting to that data in order to populate your chart. Since there are multiple data source types to choose from, the steps for connecting these data sources to your chart will differ. Below we discuss the steps to follow for connecting your charting web part to another web part, and for connecting your charting web part to an external data source.
The 4 steps of the Data Connection Wizard
- Step 1: Choose A Data Source.
- Step 2: Connect To Your Data Source.
- Step 3: Retrieve Data.
- Step 4: Bind Your Chart To Data.
External Database Connections
When connection to an external database (in step 1, select Connect To An External Database Or Spreadsheet.), you can switch between entering a connection string and building a connection string.
By default, step 2 lets you enter a connection string. Click the connection string icon to build a connection string:

When building a connection string, the Data Connection Wizard displays properties for the selected Connection type. Enter or choose appropriate values for your connection, then click the wizard icon to return. Click Cancel to ignore your changes and return.
You can click the wizard icon to return to the enter a connection string page:

Filtering Data
In step 3 of the Data Connection Wizard, you can, for example, filter the data coming from a Site List:
- Expand the Filter section to add filters.

- Enter a Parameter Name (e.g., name of a column in your site list), select the parameter's data type from the Type list, choose an operator (=, <, >, <>, <= and >= are all supported), and enter a comparison value.
- Click Preview Data to see how your filter affects the resulting data.
Common Items Found In Step 4 Of The Data Connection Wizard
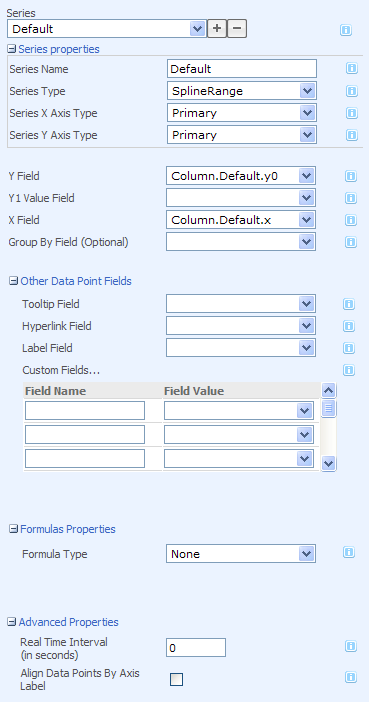
In step 4 of the Data Connection Wizard you will find a number of common elements that can be used to configure how the chart binds to the data provided by the data source chosen. Since these elements are available to you regardless of the data source used, they will be described here.
 |
|
Figure 2: Step 4 of the Data Connection Wizard. |
Series Properties
- Series Name:
- Series Type:
- Series X Axis Type:
- Series Y Axis Type:
Other Data Point Fields
- Y Field:
- Y1 Value Field:
- X Field:
- Grouped By Field (Optional):
Formula Properties
- Formula Type: Expanding this dropdown menu lets you access the following formulas:
 |
|
Figure 3: Formula types available. |
This section of the wizard will display all of the options that pertain to the specific formula chosen in the Formula Type dropdown menu. Figure 4 below demonstrates the options that are displayed when the Forecasting formula is chosen.
 |
|
Figure 4: The options that are displayed when the Forecasting formula is chosen. |
For more information on how to use formulas, refer to the topic titled Formulas Overview.
Once Your Data Source Has Been Chosen
Once you have completed step 1 above, you are then ready to choose one of the article links below to continue with the data connection process. As explained above, each data source has been partnered up with its own specific article to describe its use as well as its progression through the Data Connection Wizard. Choose an article link below to continue.
Choose a link to continue ...
Get Data From Another Web Part
Connect To A Site Definition List
Connect To Data From An External Database Or Spreadsheet
Connect To A Business Data Catalogue